Building an E-commerce Website With ExpressionEngine, Part 5
Part 5: Templates
5a) Structure leads the way
To introduce the templates, I want to show how we have our checkout steps configured.
We use the popular Structure add-on to manage the content in our FakeBowling.shop, which has very few Structure pages including “Your Cart,” “Your information,” “Shipping options.” etc, which are tied to the steps of the checkout process as customers progress through their order.
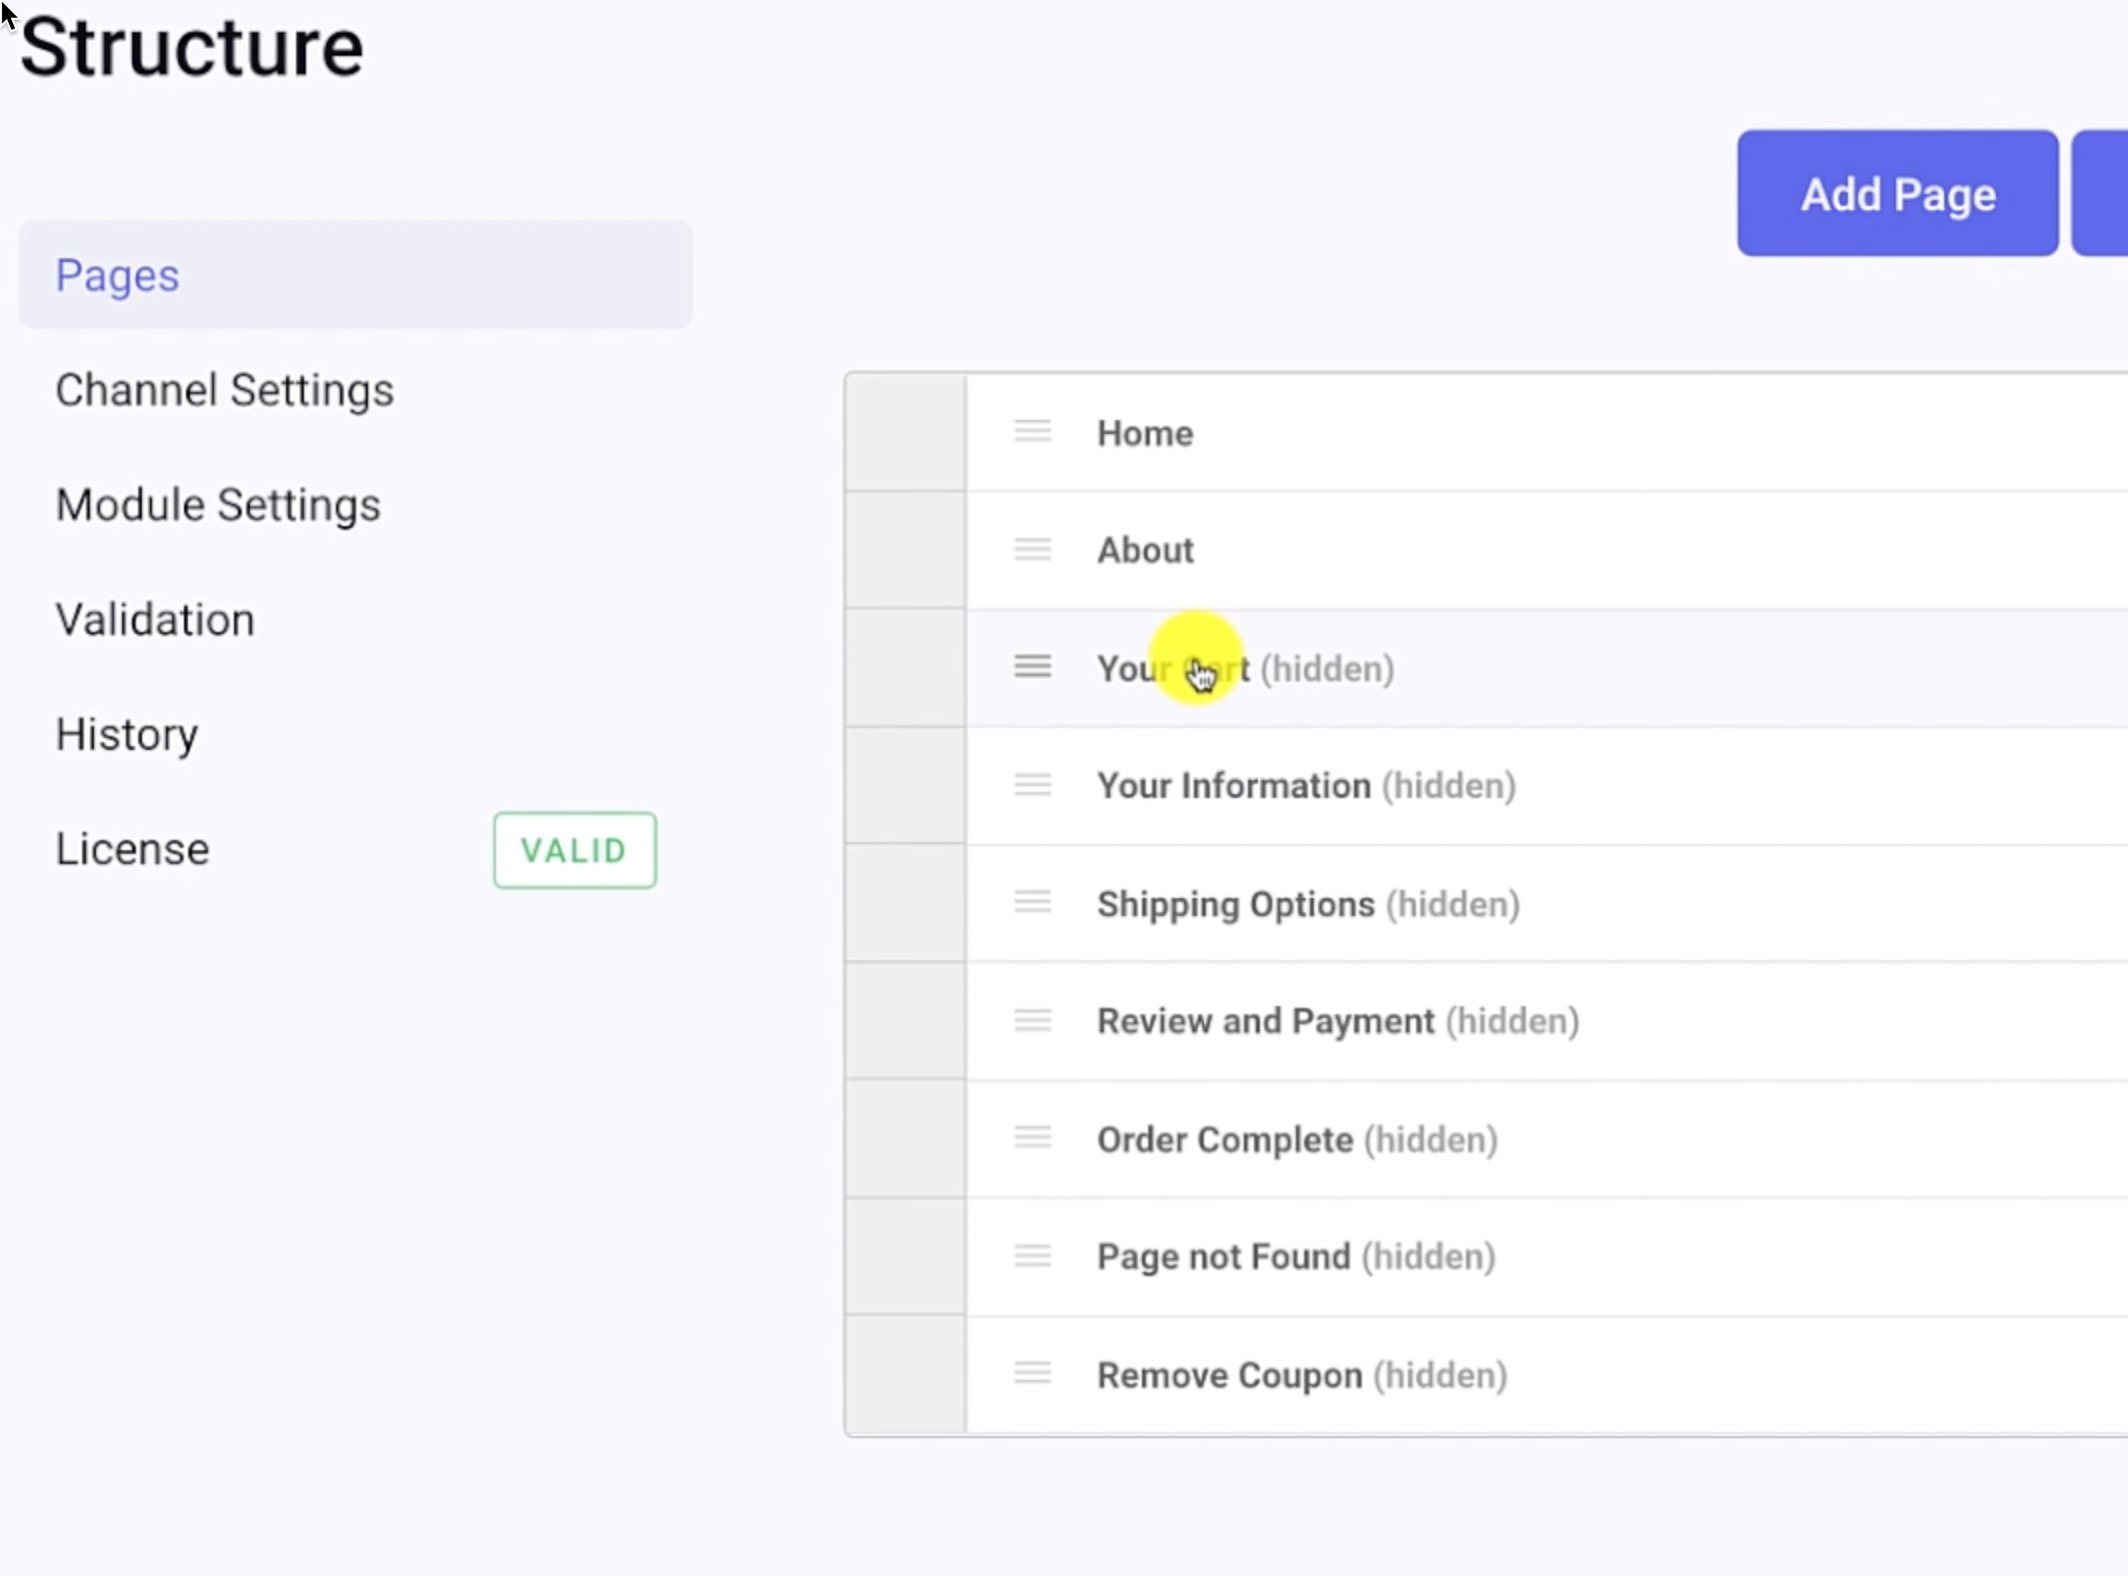
If you look at one of these entries, it’s a blank, placeholder page for with a Structure setting pointing it to our template: main/ecommerce.
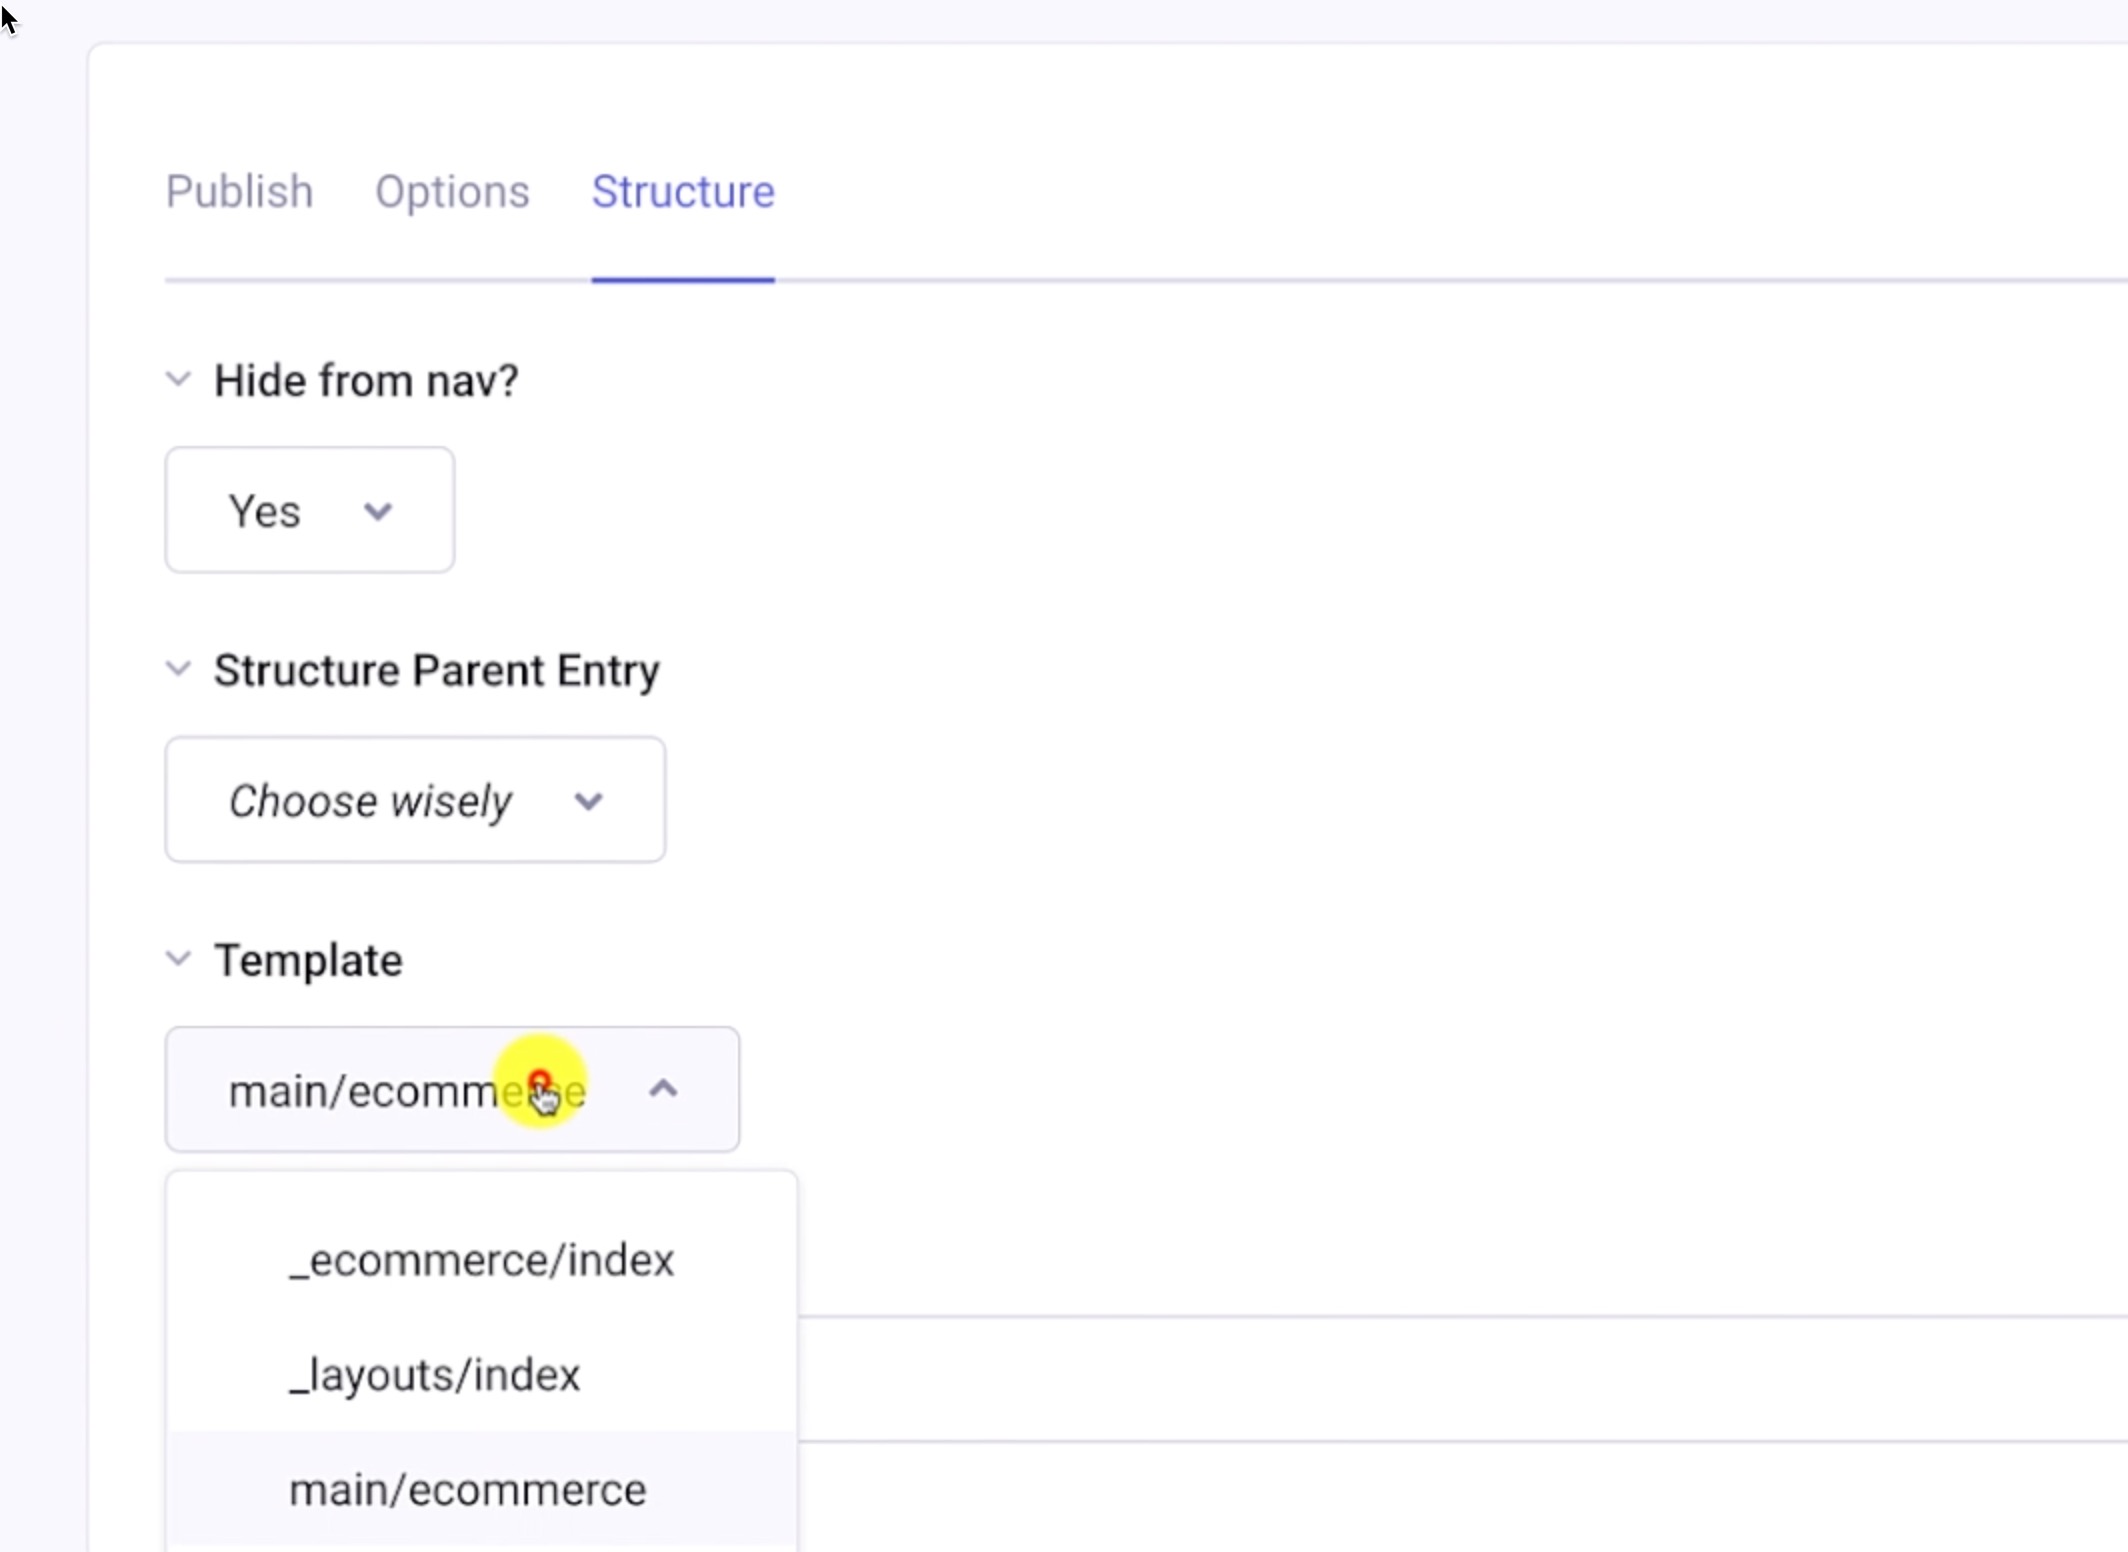
In our template groups, you’ll see the ecommerce template, which through a series of embeds looks at the segment of the URL, and then loads the appropriate template code. In other words, we simply pair the Structure page relating to a step in the checkout process to the appropriate master ecommerce template for our site.
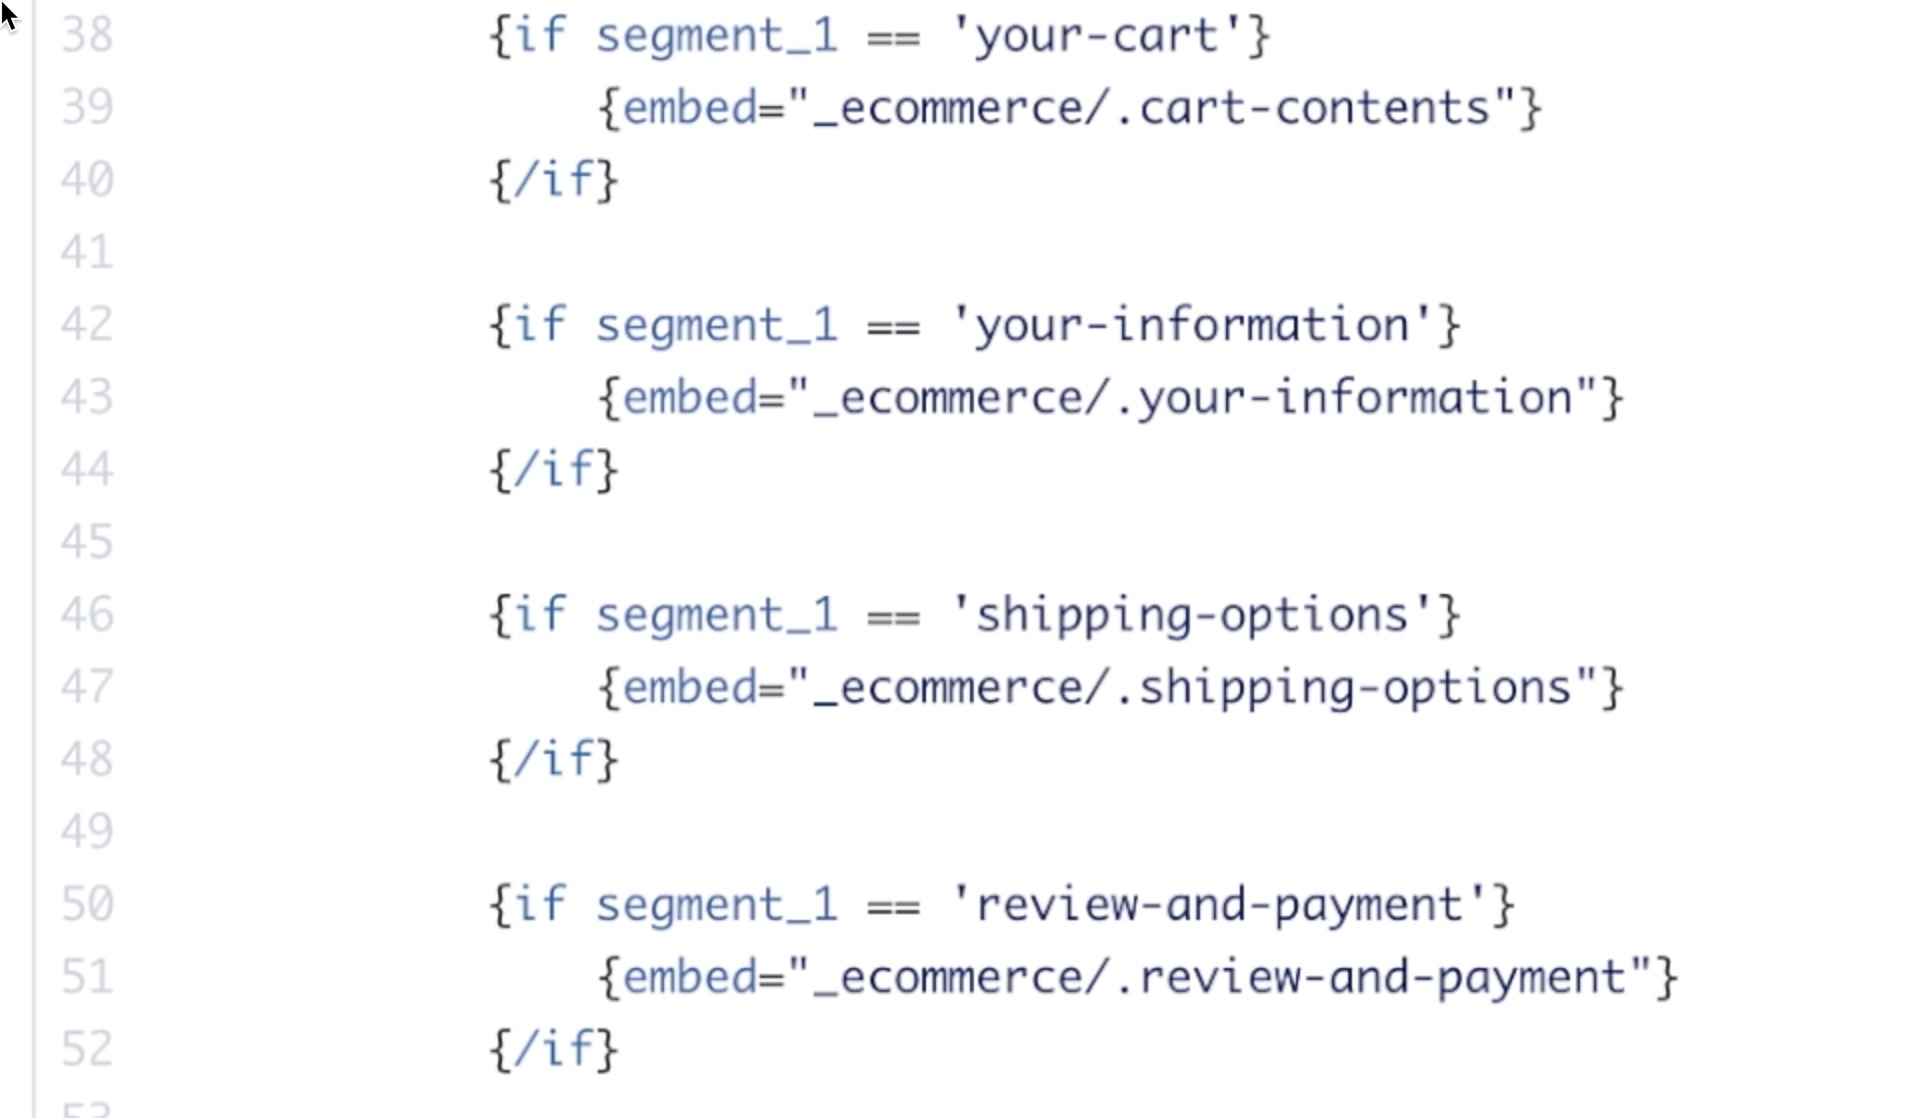
Those embeds intern call a series of hidden templates within a template group called _e-commerce with template code for all the conditions and situations that come up during a checkout.
5b) Template highlights and considerations
The CartThrob documentation is the best resource for all available tags, but I’ll focus on those used in our Fakebowling.Shop example. Let’s look at a few key (not all) templates from the list above, in the order that they would be encountered during our 5-step customer checkout.
1) exp:cartthrob:add_to_cart_form
The first logical action to consider in any shopping cart is adding a product to the cart. Sounds like a job for {exp:cartthrob:add_to_cart_form}.
Notes about this block of code: We are in an entry template, within an {exp:channel:entries} loop. Note the return=”/your-cart” parameter, which will post the form submission and send is into the first segment of our cart journey. Note another loop inside {exp:cartthrob:add_to_cart_form}, {exp:cartthrob:item_options entry_id="{entry_id}"}. Any options for that product (size, color) will be displayed such that they can be selected in the form. If there are no options, no problem! The customer can simply specify a quantity and click ‘Add to Cart’.
{exp:cartthrob:add_to_cart_form
return="/your-cart"
id="addToCartForm"
autocomplete="off"
entry_id="{entry_id}"
}
<div class="productAddToCart">
{exp:cartthrob:item_options entry_id="{entry_id}"}
<div class="formField">
<div><label class="addToCartFormRowLabel">{option_label}</label></div>
<div>
{select}
<option {selected} value="{option_value}">{option_name} {if sku} (SKU: {sku}){/if} {option_price}</option>
{/select}
</div>
</div>
{/exp:cartthrob:item_options}
<div class="formField">
<div><label class="required" for="quantity">Quantity</label></div>
<div><input id="quantity" name="quantity" required="required" type="text" value="1" style="max-width: 100px;"></div>
</div>
<input class="button expanded" type="submit" value="Add to Cart" />
</div>
<div>
{/exp:cartthrob:add_to_cart_form}
2) exp:carthrob:update_cart_form, exp:cartthrob:cart_items_info
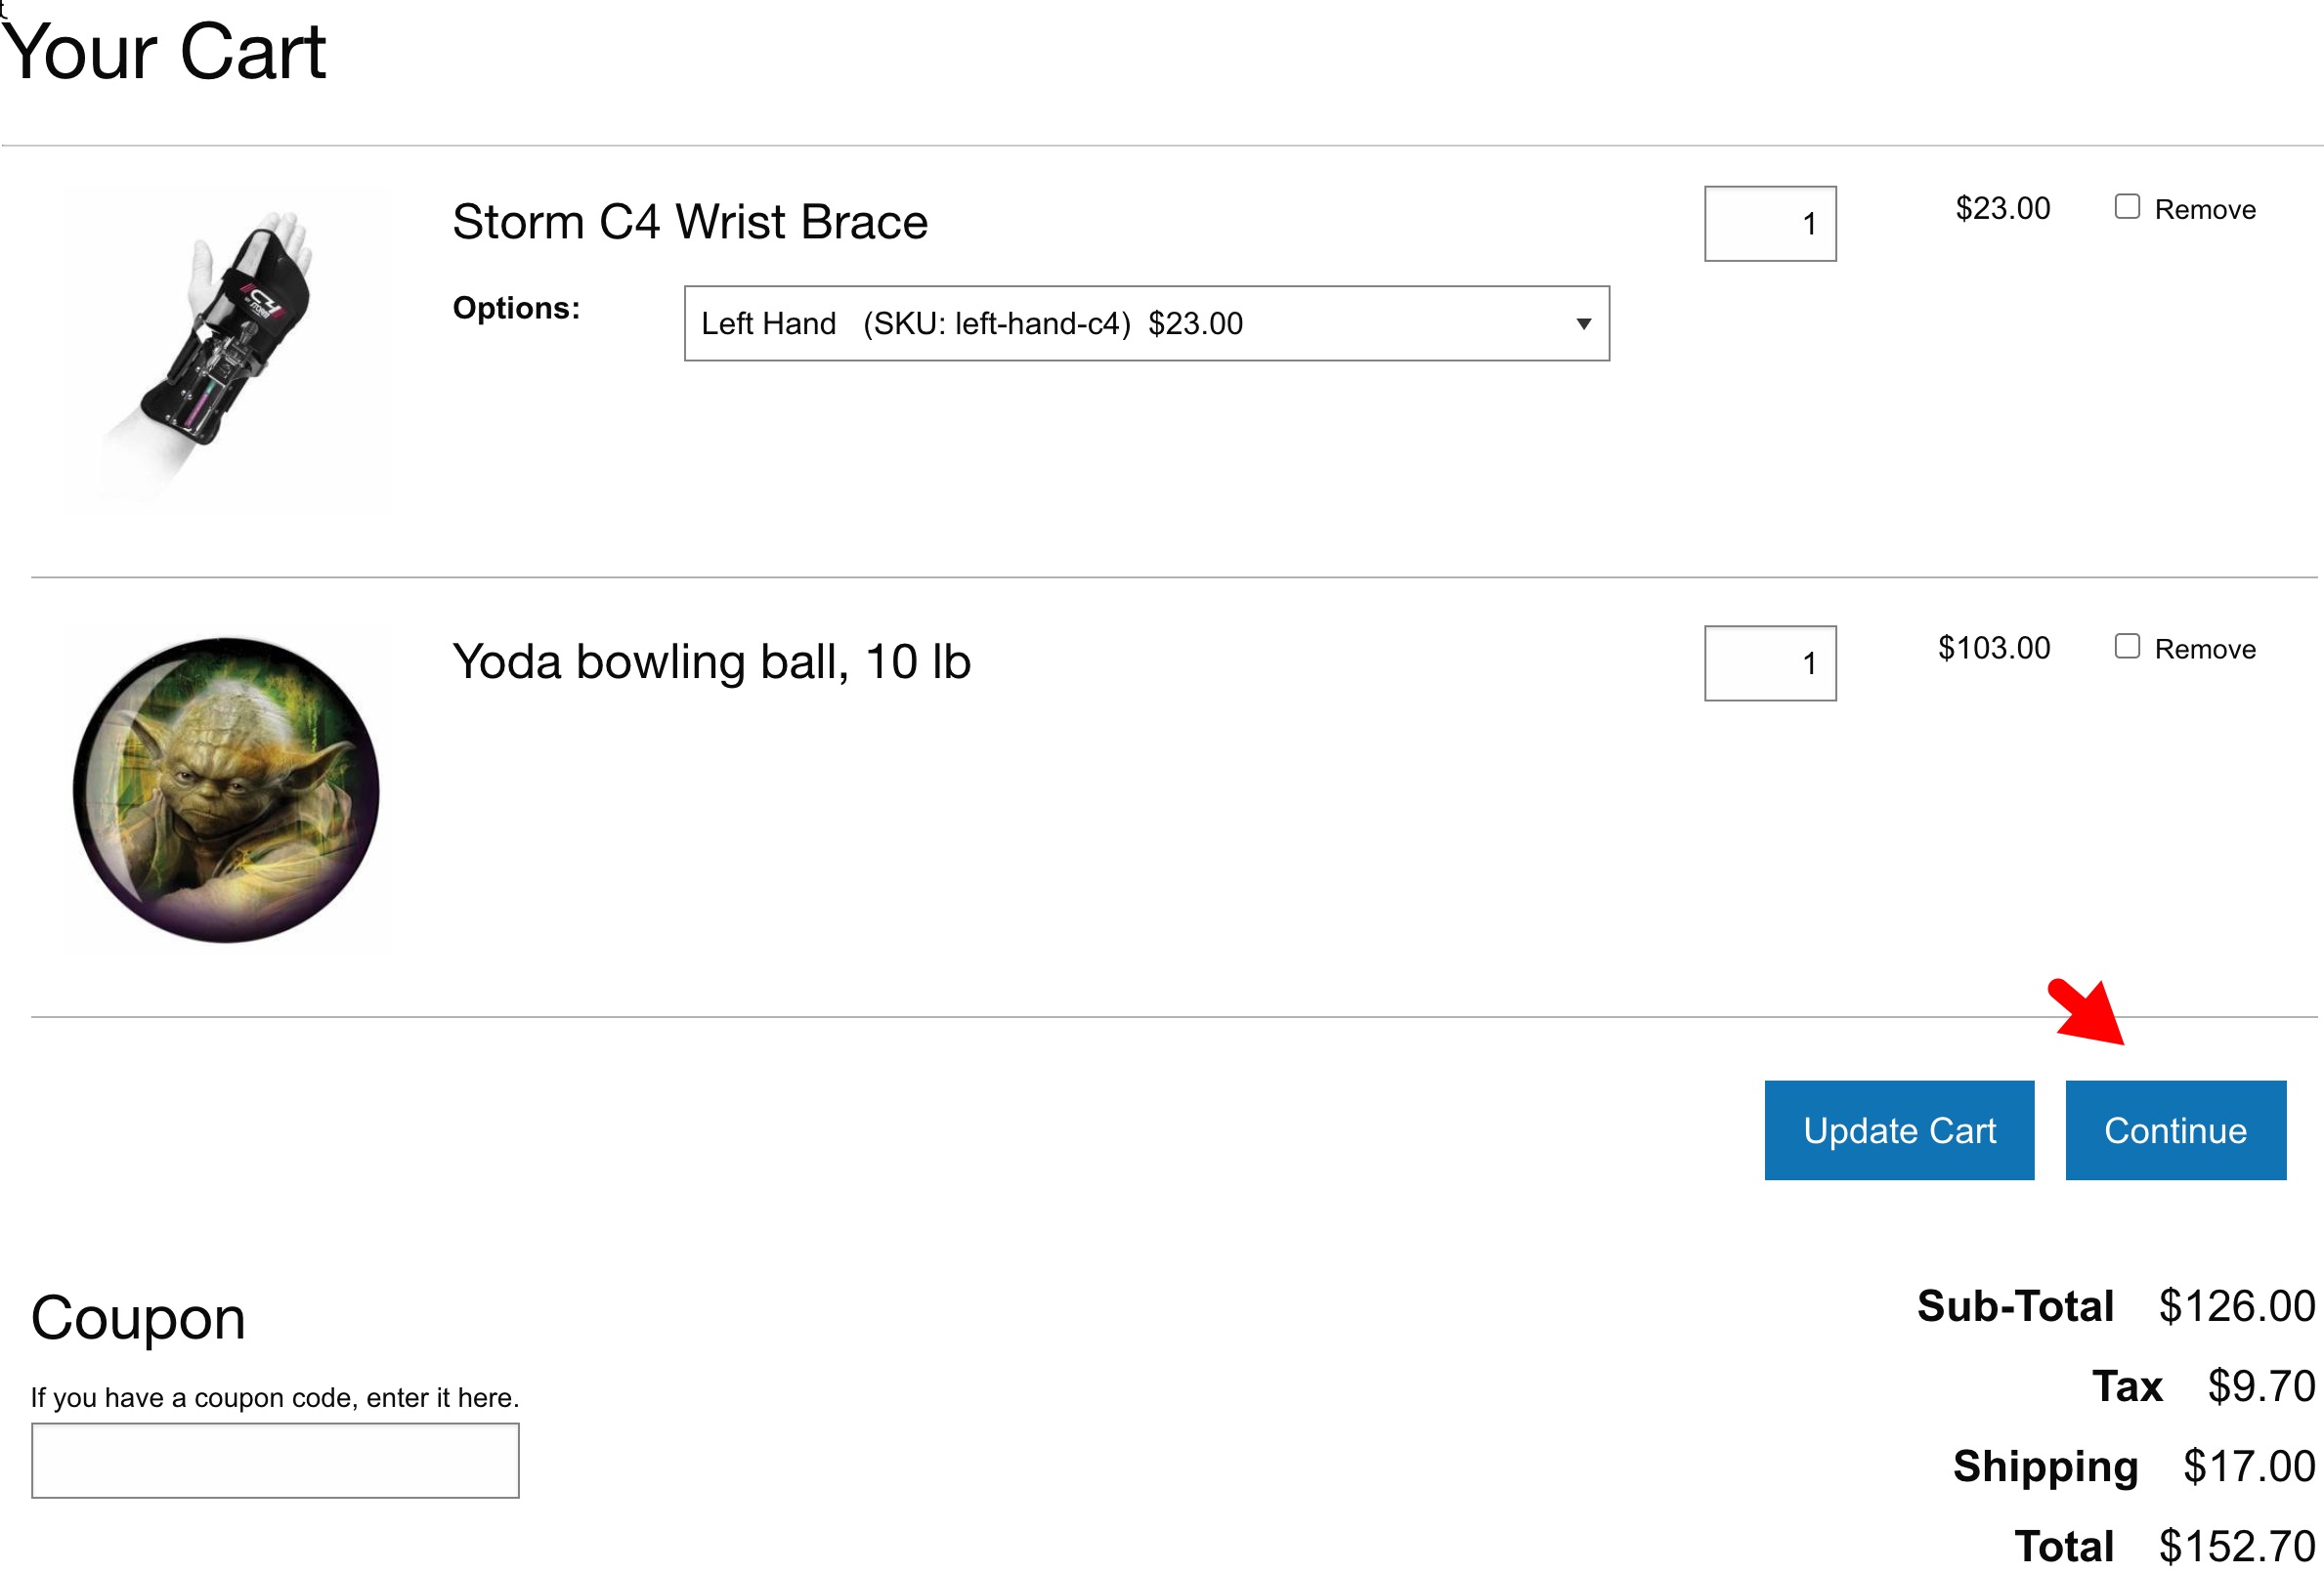
The item is now in your cart, and the product page sent us to /your-cart, where we see our cart contents on display (to be edited or confirmed).
Notes about this block of code: We are displaying the cart contents within an {exp:cartthrob:update_cart_form} tag pair. Why? Well, if the customer wants to change quantities or delete an item entirely, we’ll be able to furnish those changes to CartThrob. If no changes are needed in the cart, this tag simply won’t be submitted.
After update_cart_form, the power {exp:cartthrob:cart_items_info} makes an appearance. From the CartThrob docs, “The cart_items_info tag works similar to the channel entries module, and is intended to print out the contents of the customer’s cart.” Finally, another loop of {exp:cartthrob:item_options} to display any chosen options.
{exp:cartthrob:update_cart_form
return="/your-cart"
id="updateCartForm"
name="updateCartForm"}
{exp:cartthrob:cart_items_info}
<div class="cartRow">
<div class="cartItemImage">
{embed="_ecommerce/.product-image" entry_id="{entry_id}"}
</div>
<div class="cartItemDescription">
<h4>{title}</h4>
{exp:cartthrob:item_options entry_id="{entry_id}" row_id="{row_id}"}
<div class="formField cartItemOption">
<div><label class="cartOptionsLabel">{option_label}:</label></div>
<div>
{select}
<option {selected} value="{option_value}">{option_name} {if sku} (SKU: {sku}){/if} {option_price}</option>
{/select}
</div>
</div>
{/exp:cartthrob:item_options}
</div>
<div class="cartItemQuantity">
<input id="quantity_{row_id}" name="quantity[{row_id}]" required="required" type="text" value="{quantity}">
</div>
<div class="cartItemTotal">
{item_subtotal}
</div>
<div class="cartItemRemove">
<label><input name="delete[{row_id}]" type="checkbox">Remove</label>
</div>
</div>
{/exp:cartthrob:cart_items_info}
<div class="cartPageButtons">
<input class="button" type="submit" value="Update Cart">
<a href="/your-information" class="button">Continue</a>
</div>
{/exp:cartthrob:update_cart_form}
I’m not going to make any edits to my cart, so I’ll click the Continue button, which is a simple HTML button linking to the next step in the process, /your-information.
3) exp:cartthrob:customer_info, exp:cartthrob:save_customer_info_form
These particular tags are very robust and have many parameters. In our checkout, we present both a Billing and Shipping address to the customer and give them a chance to adjust either before they continue.
Notes about this block of code: I redacted several repetitive address fields to not confuse the CartThrob logic that is at play. We need to wrap the bulk of the template in a {exp:cartthrob:customer_info} tag to access the stored address information (should they have a member profile, for example). Within the next tag layer is a {save_customer_info_form} which will take the address information and post it to the form.
From the CartThrob docs:
exp:cartthrob:customer_info: “This tag pair provides a simple method of accessing customer data that has been saved to SESSION* using save_customer_info_form or update_cart_form”
exp:cartthrob:save_customer_info_form: allows “you to save customer info during your customers visit to simplify the creation of a multi-page checkout.”
{exp:cartthrob:customer_info}

    {exp:cartthrob:save_customer_info_form
        return="/shipping-options"
        id="customerInfoForm"
        required="first_name|last_name|address|city|state|zip|country_code|shipping_first_name|shipping_last_name|shipping_address|shipping_city|shipping_state|shipping_zip|shipping_country_code"
        error_handling="inline"}

        <div class="cartFieldGroup">
            <div>
                <label for="email_address" class="required">Email</label>
                <input id="email_address" name="email_address" required="required" type="email" value="{email_address}">
                {if error:email_address}<br><span class="error">{error:email_address}</span>{/if}
            </div>
            <div>
                <label for="phone" class="required">Phone</label>
                <input id="phone" name="phone" required="required" type="tel" value="{phone}">
                {if error:phone}<br><span class="error">{error:phone}</span>{/if}
            </div>
        </div>

        <div class="ecommerceBlocks">
            <div>

                <div class="cartFieldGroup">
                    <h3>Billing Information</h3>

                    <div>
                        <label for="first_name" class="required">First Name</label>
                        <input id="first_name" name="first_name" required="required" type="text" value="{first_name}">
                        {if error:first_name}<br><span class="error">{error:first_name}</span>{/if}
                    </div>
                    ... hidden ...
                    <div>
                        <label for="zip" class="required">Zip</label>
                        <input id="zip" name="zip" required="required" type="text" value="{zip}">
                        {if error:zip}<br><span class="error">{error:zip}</span>{/if}
                    </div>
                    <input name="country_code" type="hidden" value="USA">
                </div>

            </div>
            <div>

                <div class="cartFieldGroup">
                    <h3>Shipping Information <a href="#" id="copyBillingInfo">Copy billing</a></h3>

                    <div>
                        <label for="shipping_first_name" class="required">First Name</label>
                        <input id="shipping_first_name" name="shipping_first_name" required="required" type="text" value="{shipping_first_name}">
                        {if error:shipping_first_name}<br><span class="error">{error:shipping_first_name}</span>{/if}
                    </div>
                    ... hidden ...
                    <div>
                        <label for="shipping_zip" class="required">Zip</label>
                        <input id="shipping_zip" name="shipping_zip" required="required" type="text" value="{shipping_zip}">
                        {if error:shipping_zip}<br><span class="error">{error:shipping_zip}</span>{/if}
                    </div>
                    <input name="shipping_country_code" type="hidden" value="USA">
                </div>

            </div>

        </div>

        <div class="cartPageButtons">
            <input type="submit" value="Continue" class="button">
        </div>

    {/exp:cartthrob:save_customer_info_form}

{/exp:cartthrob:customer_info}
I’ve specified my Billing and Shipping info, so I’m ready to click Continue to progress to /shipping-options.
4) exp:cartthrob:cart_shipping, or perhaps exp:cartthrob:get_live_rates_form
Our shipping setup for Fakebowling.shop is very. Since we used the By Weight - Threshold plugin, there’s nothing for the customer to select. We display the calculated amount with a simple one-liner.
Your calculated shipping cost is: <strong>{exp:cartthrob:cart_shipping}</strong>
Need something more robust? Shipping so simple is the above example is pretty rare. Below is a snippet to demonstrate how live rates calculation might be used.
Notes: the exp:cartthrob:get_live_rates_form has a return value to send the customer to the final page in the checkout process, /review-and-payment. Key tags:
get_shipping_options: “This tag pair outputs available shipping options. For instance, it will return available options used in conjunction with the shipping plugin called “Customer Selectable Flat Rates”. The information it returns varies by shipping plugin.”
liverates_price: Calculated value of the chosen liverates shipping plugin ({price} variable with liverates_ variable prefix)
{exp:cartthrob:get_live_rates_form shipping_mode="shop" id="shippingOptions" return="/review-and-payment"}
<div class="cartFieldsetWrapper">
<div class="cartFieldGroup">
<div>
<div class="cartFieldGroupLabel"><label for="shipping_option">Shipping Method</label></div>
<p class="required">Required</p>
</div>
<div>
<div class="formRow">
<div class="formField">
<div>
<fieldset>
<legend>Shipping Options</legend>
{exp:cartthrob:get_shipping_options variable_prefix="liverates_"}
{if liverates_rate_short_name == 'ups'}
<label for="{liverates_rate_short_name}"><input id="{liverates_rate_short_name}" name="shipping_option" value="{liverates_rate_short_name}" type="radio" checked="checked" required="required"> {liverates_rate_title}</label><br><br>
{if error_message}{error_message}{/if}
{if:else}
<label for="{liverates_rate_short_name}"><input id="{liverates_rate_short_name}" name="shipping_option" value="{liverates_rate_short_name}" type="radio" {liverates_selected} required="required"> {liverates_rate_title} ({liverates_price})</label><br>
{if error_message}{error_message}{/if}
{/if}
{/exp:cartthrob:get_shipping_options}
</fieldset>
{/if}
</div>
</div>
</div>
</div>
</div>
</div>
<div class="cartPageButtons">
<span></span>
<button type="submit" form="shippingOptions" value="Review & Payment" class="button bigCartButton"><span>Proceed to Review & Payment</span></button>
</div>
{/exp:cartthrob:get_live_rates_form}
5) exp:cartthrob:checkout_form
We’ve now confirmed cart contents, addresses, and shipping, and we’re ready to submit our order!
{exp:cartthrob:checkout_form}: No surprise here; this important tag “outputs a checkout form, gathers values for payment processing and initiates processing & payments.”
{gateway_fields}: “Use the “gateway_fields” variable to automatically output all required and optional fields used by your selected payment gateway.” (You can override and handle these form inputs manually, as we often do).
Notes: Just a few parameters for our store, setting the return URL (/order-complete) and setting the gateway value of stripe. We offer an order_note field that is a standard ExpressionEngine field, but CartThrob looks for that name specifically. “You add custom data to entire orders in the checkout_form. If you have a custom field in your orders channel named order_notes”.
{exp:cartthrob:checkout_form
    return="/order-complete"
    secure_action="yes"
    id="checkout_form"
    gateway="stripe"
    }

    <h3>Order Note</h3>
    <textarea name="order_note" cols="75" rows="4"></textarea><br><br>

    {gateway_fields}

    <h3>Payment Details</h3>

    <div id="checkout_form_gateway_fields">
        <div class="control-group" style="margin:auto;width:80%">
            <!-- placeholder for card elements -->
            <div id="card-element"></div>
        </div>
    </div><br><br>

    <div class="cartPageButtons">
        <input class="button" type="submit" value="Submit Order">
    </div>

{/exp:cartthrob:checkout_form}
We have what we need! All that remains is the final Submit Order action, and we’ll hopefully:
- Send our order to the payment gateway
- Email receipts the customer and store owner
- Deduct any inventory from the products
- Send the user to the Order Complete page
Conclusion
CartThrob is a mature, robust ecommerce platform. Coupled with ExpressionEngine, one can build stores of high complexity, but it’s well-suited for smaller stores as well.
Like ExpressionEngine, CartThrob is built to be customized. That also means it can feel a little “bare” to a beginner. It doesn’t roll out the red carpet to guide you through all the steps of the store build, but when you have command of the template tags, you can scale the features of your store pretty quickly. ERP integration and inventory sync, APIs, and all manner of communication with other systems are possible.
We only scratched the surface of what is possible with CartThrob, but hopefully this walkthrough has you well on your way!
Acknowledgements
I’ll reiterate that Greg Crane developed these example templates, and the general configuration covered in this walkthrough is from his own successful store builds.
Downloads
Please download our example templates to follow the steps of our walkthrough. Download Templates
Have questions or comments about this course? Be sure to join the discussion and post in the ExpressionEngine Forums!
Comments 0
Be the first to comment!