
Compiling Web Assets with Mix and Webpack
When I first started in web development (and I’m about to age myself seriously), this meant creating sites on Geocities with very crude styling, and, in my case, lots of <blink> and <marquee> tags. It meant creating Myspace profile themes to bring a splash of flair to my mall emo self.

Things have changed quite a bit!
Nowadays, it is a vital skill to know how to write your styles and scripts with modern methods, which means learning how to use asset compiling to make sure your code is clean and works well with your project.
Although there are a thousand different options out there, my favorite has been using Laravel Mix and Webpack. And while we are mentioning another project here, Mix and Webpack are easy drop-in options for your next ExpressionEngine project!
Why Compile Your JS and CSS?
There is nothing wrong with building straight CSS or JavaScript files. It works perfectly fine, and allows you to build in a familiar way.
But there are some core reasons to move from writing and wrapping up your own code to running it through a compiler.
Use Modern Methods
CSS is great, but what about modern building processes like PostCSS or SASS/SCSS? Or what if you want to build your JavaScript with modern ES6 or beyond? Browsers don’t work well with modern methods. Running your assets through a compiler also allows for them to be transpiled down to methods and modes that your users’ browsers can understand.
Compile To One File
Let’s say you want to split up your styles into a modular setup, to better help you and other developers on the project find the style they need. Or you want to split your Vue components out into their respective component files. But, you also don’t want your HTML to bring in 30,000 files.
Using an asset compiler allows you to pair down all of your assets into a few files. In our case, we can put a thousand styles files and a million JS components, and we’ll still bring in only two optimized files to our ExpressionEngine site.
Make It Ugly!
Your Google page speed is vital to your site being both SEO and user friendly, but it will get punished for having resources that are not minimized. Mix allows you to uglify and minify your assets when you are ready to build for production, so that your users get a better user experience and you look like a rockstar!
Installing Mix and Webpack
You’ll want to make sure you have the most up-to-date versions of Node and either NPM or Yarn before proceeding. For the examples below, I’ll be using npm.
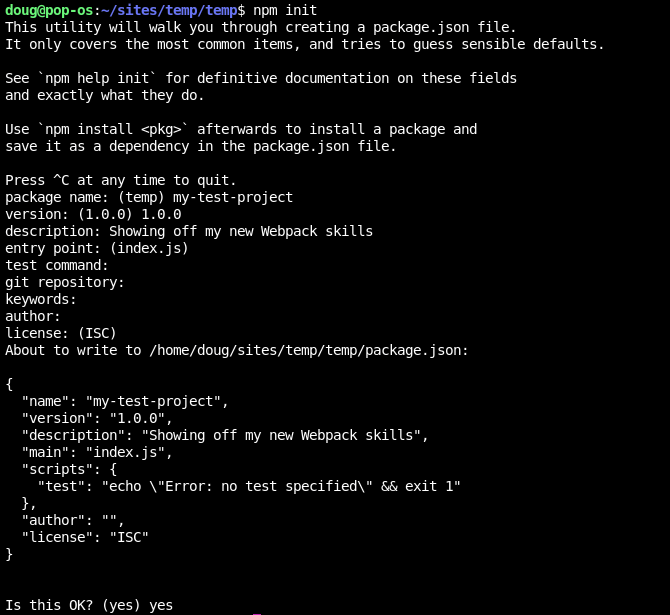
Run npm init if you don’t already have a package.json file in your root. You’ll be asked a number of questions to set it up.
Then, in the root of your web project, you’re going to install Mix and Webpack as dev dependencies.
npm install --save-dev laravel-mix webpack webpack-cli
This will create a package.json file in your root directory with a few other dependencies. (NOTE: This won’t install all of Laravel or anything like that).
In the scripts section of your package.json file, you’ll want to create a few scripts that you can run to compile your assets.
"scripts": {
    "dev": "npm run development",
    "development": "cross-env NODE_ENV=development node_modules/webpack/bin/webpack.js --progress --config=node_modules/laravel-mix/setup/webpack.config.js",
    "watch": "npm run development -- --watch",
    "watch-poll": "npm run watch -- --watch-poll",
    "hot": "cross-env NODE_ENV=development node_modules/webpack-dev-server/bin/webpack-dev-server.js --inline --hot --config=node_modules/laravel-mix/setup/webpack.config.js",
    "prod": "npm run production",
    "production": "cross-env NODE_ENV=production node_modules/webpack/bin/webpack.js --no-progress --config=node_modules/laravel-mix/setup/webpack.config.js"
}
These are some standard scripts that will allow you to compile your assets in a super simple way:
- dev / development compiles your assets without uglifying and minimizing. It also enables any debugging in dependencies you may be using.
- prod / production compiles and applies any uglification you may be using.
- watch runs dev and watches for any changes, so you can live reload your files.
Setting Up Your Mix Setup
Now, we need to set up Webpack and our root folders.
In the root of your project, create a directory called resources. This will be where your new CSS and JS files will live. Create a folder for each of these in your resources, so you have a place for each.
- resources
  - css (or scss if you want)
    - main.css (or main.scss)
  - js
    - main.js
These folders will be where the files you will work on will live.
So my entire project looked like this:
my-project
  - public
    - images
    - themes
  - resources
    - scss
      - main.scss
    - js
      - main.js
  - system (where all of the EE files live)
(It’s always recommended to move your system folder out of your webroot. In this example, my webroot is the public folder)
Then, in the root of your project, we’ll create a webpack.mix.js file, which will act as the configuration for our project. This is where we tell Mix how to build out our assets, when to uglify, or set up other dependencies that are run when your assets are being built. For this project, my webpack.mix.js file looked like this:
const mix = require('laravel-mix');

mix.js('resources/js/main.js', 'public/js')
    .sass('resources/scss/main.scss', 'public/css');
This is a base setup that does two things:
Take all of my JavaScript files that are processed through resources/js/main.js and compile them to public/js/main.js.
Take all of my styles that are processed through resources/css/main.css and compile them to `public/css/
We’ll also need to add our styles and scripts to our site. This will differ depending on how you are building your site. Assuming you are using ExpressionEngine’s template layouts, you may have a layout file that looks like this.
<!DOCTYPE html>
<html class="no-js" lang="en">
<head>
    <meta charset="utf-8">
    <meta name="viewport" content="width=device-width, initial-scale=1">
    <title>My Site</title>
    {!-- Our Compiled Styles --}
    <link rel="stylesheet" href="/css/main.css">
</head>

<body>
    {layout:contents}
    {!-- Our Compiled Scripts --}
    <script src="/js/main.js" async></script>
</body>
</html>
Building Your Assets
The hard part is over! Now, we can run npm run watch to start compiling our files!
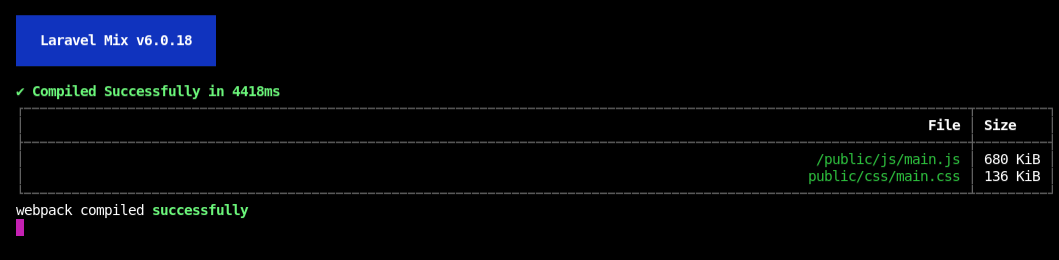
This will begin taking what is in your resources directory, run them through the magic of Webpack and Mix, and build out your files!
Comments 5
benjivm
If you want to take advantage of the cache busting available through Laravel Mix’s generated mix-manifest.json file you can use my ExpressionEngine plugin: https://github.com/benjivm/mixeer
manuqc
hello! thanks for creating this walkthrough, I am trying to learn more about webpack and laravel following your tutorial, although I am getting the following issue:
‘cross-env’ is not recognized as an internal or external command, operable program or batch file.
when I use, npm run dev. Do you have any idea how to fix these please?
dougblackjr
@manuqc This is usually a missing package within your package.json. Your best bet is to try:
Running:
Then run:
And then run your build process.
manuqc
ah great, that was it! thanks Doug!
mc2design
Still my favorite way to compile assets. I recommend using Ben’s addon as well so you can make use of the asset versioning/cache busting features of Mix.
https://github.com/benjivm/mixeer