Templating - Multi-entry Templates
We’re almost there! We finished off our Single Entry templates for our Homepage, Contact and About pages in the last installment, so let’s dive into our final two sections. So far, we’ve been using a dedicated template for each ‘page’ of our site where each template was only being used to display one single Entry. This makes sense when you have single-page top-level sections, but for our Services and Work sections, we have one main section with several sub-pages with the same fields available to each sub-page. EE Templating allows us to use a single template where we can use what’s in the URL to determine what to show. Let’s dive in!
In This Article:
Step 1: Building the Services Section
The Services section is comprised of 4 pages: one main landing page (Services) and the 3x individual ‘service’ pages
(Graphic Design, Web Development, Digital Marketing). Each of these pages still has one single entry for each one -
we set up the content for these earlier, so we have 4 Entries in our Services Channel - but we’ll
use one template to handle displaying all of them (and any future Service Entries). WE WANT the URL
for the landing page to be example.com/services, so just like the About/Contact pages, we need a
‘services’ Template Group with an index.html template.
NOTE: We’ve created new Template Groups a couple of times already, each time using the main menu. This time around, I will introduce the new Jump Menu that’s new in EE6. The Jump Menu is in the top-right of the control panel and is a handy new way to navigate around the Control Panel. It uses fuzzy logic to search through various actions so you can find things really quickly, even if you don’t know where they are in the CP. Let’s use it going forward for all our actions.
-
Hold
CTRLorCMD, then pressJon your keyboard to activate the Jump Menu. Start typing and notice the shortcuts in the dropdown change as you type. Type "crea temp" and notice the ‘Create Template Group’ is the first option in the dropdown and it’s highlighted. You can move up and down the items in the dropdown with your arrow keys, but in this case, just hitEnterto go to the ‘New Template Group’ screen: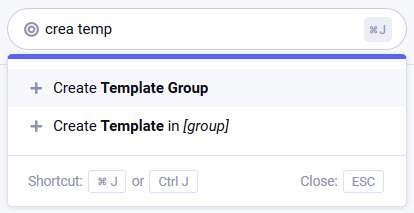
-
Set the name to
servicesand again, we’ll duplicate an existing group just to get a head-start on ourindextemplate - select to duplicate theaboutgroup and then save
-
Open the new
services/indextemplate in your text editor and update thechannelparameter sochannel="services", then head to your browser and go toexample.com/services
The Landing Page
The fields available to the Services Channel are the same as the About Channel - and we’ve already build out the
Page Builder field template code (being utilized by our {par_page_builder_fluid_field}
partial) - so we don’t have to do anything at all within the {exp:channel:entries} tags here… but
notice we have a problem! The {exp:channel:entries} tag is set correctly to pull through just one Entry
from the Services Channel, but it’s pulling through the wrong one (assuming you created the
Services page first then created the sub-pages after like I did). In previous examples, we deliberately only had one
Entry in the Channels, but in this case, we have multiples, and by default, the Channel Entries Tag orders the
Entries it loops through by the Entry Date field and sorts them ‘descending’ (i.e., newest first). This is
really handy for things like news, blog, or portfolio items, but not here.
So we need a way to distinguish the landing page from the other sub-pages. We thought about this in our Content Model planning and when building out our Channels, we created a new Status for this very purpose called "Default Page." So we can use that to identify the landing page:
- Back in the
services/indextemplate, update the opening Channel Entries Tag to:{exp:channel:entries channel="services" limit="1" status="Default Page"}then save and refresh
example.com/servicesin your browser.
Great, so now our example.com/services page is loading the right Entry, and the page looks good!
The Sub-pages (aka Individual Service Pages)
Now we have our landing page working, but if you go in your browser to
example.com/services/graphic-design, you’ll see we still get our services/index template
loading (we can tell from the header/footer still displaying), but there’s no Channel content there - the
{exp:channel:entries} tag isn’t outputting anything.
NOTE: Thus far, we haven’t paid too much attention to URLs other than to explain the default template routing uses the first ‘segment’ of the URL to establish the Template Group and the second to establish the actual Template. But we’ll be looking at this closer in this section, so it’s important to know in the URL
example.com/services/graphic-design, the first segment isservices, the second isgraphic-design(and so on).
So why isn’t our Channel Entries Tag returning anything anymore? The short answer is because to cater for the landing
page above, we added the status parameter that is limiting the output of the tag to
only return Entries with the "Default Page" status. But the full answer is worth
understanding.
Dynamic URL Segments & Segment Variables
By default, the Channel Entries tag tries to use the information in the URL to establish the right Entry to display.
We touched on this earlier when discussing how the dynamic="no" parameter (docs) disables this. Now that
we have a second segment in the URL, the default EE template routing is first looking for a template with the name
of our second segment (i.e., services.group/graphic-design.html), but that template doesn’t exist…
and we don’t want it to exist because don’t want to have to create a totally new template every time we add a
Service sub-page. If there isn’t a specific individual template that matches the 2nd segment, then the rendering
engine’s next step is to load the index template for the group and use the 2nd segment to try and find
an Entry with that segment as the URL Title.
Remember that each Entry has a URL Title which is automatically generated when you enter the Title
(and can be overridden if desired)… the exact purpose for this is to be able to use this in URLs and therefore be
able to identify individual entries by a specific URL pattern - typically in the 2nd segment. So the resolution to
the problem is to only set the status="Default Page" parameter in our
{exp:channel:entries} opening tag if we don’t have a second segment - in other words, only if
we’re trying to load the Services landing page.
To do this, we can use ExpressionEngine’s URL Segment Variables -
these let us grab different segments from the URL and use them in our templates. The typical use for these is
exactly what we’re about to do - query it in some way in a conditional and do something based on the result. We can
access these with {segment_1}, {segment_2}, and so on in our templates. So to finish this
off:
- Back in the
services/indextemplate, update the opening Channel Entries Tag to:{exp:channel:entries channel="services" limit="1" {if !segment_2}status="Default Page"{/if}}NOTE: When using any kind of variable in a conditional,
{if variable_name}and{if !variable_name}are the shortest ways to check if that variable exists or doesn’t exist, respectively.
And that’s it! So our completed services/index Multi-entry template looks like this:
{layout="layouts/_wrapper"}

{exp:channel:entries channel="services" limit="1" {if !segment_2}status="Default Page"{/if}}
  <h1>{if page_heading}{page_heading}{if:else}{title}{/if}</h1>
  {page_intro}
  {par_page_builder_fluid_field}
{/exp:channel:entries}
and through this one template, we’re loading both our Services landing page at example.com/services and
all of the sub-pages such as example.com/services/graphic-design. The way we set this up means that any
future Entries added to the Services Channel will display using the URL pattern
example.com/services/xxxxxxxxxxx where xxxxxxxxxxx is the URL Title of the Entry.
Step 2 - Building the Work Section
We finally made it - this step is what this tutorial is all about! Believe it or not, we’ve already covered a lot of what we need to do, so a good chunk of what we need to do is just re-doing what we’ve already done elsewhere with maybe a few adjustments. So let’s get started.
The Work Landing/Listing Page
Unlike the Services landing page, the Work landing page isn’t actually going to load a single Entry - and it won’t even be editable per se. It’s going to be dynamic in that we’ll be showcasing the Entries from the Work Channel, but it doesn’t have any editable content of its own - it’s just going to be a ‘listings’ page that shows all the portfolio items with links to each individual item’s ‘detail page.’
Note: If you wanted to offer basic editable information, such as an opening introduction paragraph on this page, one option would be to create a Template Variable to hold the text and use that within the otherwise un-editable template.
Back in Part 6, you should have added a bunch of Entries to the Work Channel, so if you haven’t done that yet, go ahead and go back and do that - aim for at least 10 total, have at least one Entry with several images and have at least 4 Entries assigned to one category.
To get started, we again need a new Template Group with an index template:
-
Use
CTRL/CMD + Jto activate the Jump Menu, start typing until you find the Create Template Group shortcut, then hitEnter
-
Set the name to
workbut don’t duplicate an existing group this time
-
Open the new
work/indextemplate in your text editor, add the same Layout declaration we’ve been using and add an <h1> for the page:{layout="layouts/_wrapper"} <h1>Our Portfolio</h1> -
Open up your
site/indextemplate and copy the code where we pulled in our 3 latest Work Entries - the concept is identical, we’re just going to adjust a few things.
-
Paste that code into your
work/indextemplate, but remove thedynamic="no"parameter - we’ll cover why later.
-
Save, then go to
example.com/workin your browser.
Your work/index template should now look like this:
{layout="layouts/_wrapper"}

<h1>Our Portfolio</h1>
<div class="row">
{exp:channel:entries channel="work" limit="3" orderby="date" sort="desc"}
<div class="col-4">
<h3><a href="{path='work/{url_title}'}">{title}</a></h3>
<p><em>{entry_date format="%F %d %Y"}</em></p>
{work_images limit="1"}
<img src="{work_images:file}" alt="{work_images:caption}" />
{/work_images}
{if client_name}
<h3>{client_name}</h3>
{/if}
<p>{excerpt}</p>
<p><a href="{path='work/{url_title}'}">Read More ></a></p>
</div>
{/exp:channel:entries}
</div>
Notice we have our <h1> tag outside of the Channel Entries loop - this is because we’re using the loop not to output a single page, but to output multiple our Work Entries - just like on the homepage, we’re pulling in ‘visiting content’.
I’ve deliberately left the limit set to 3 for now - limiting the number of Entries returned can be
explicit (like how on the Homepage we only wanted 3 Entries to show) or can be used in conjunction with
pagination and limit how many are on each paginated ‘page.’ So I’ve left this example with
limit="3" so we can cover pagination, but obviously a more realistic limit here is more like
12 or 15 for this type of ‘listing page.’
NOTE: The default
limitin a Channel Entries Tag is 100, so if you don’t explicitly set alimit, it will only return up to 100 rows for performance.
Pagination
I’ll assume you’re familiar with the concept of pagination, but if not, read up about it in the docs. Pagination will only display if:
-
You tell the Channel Entries Tag where to put the paging links with the
paginateparameter.NOTE: The options you’re most likely to use
top,bottomorbothbut note there is also aninlineandhiddenoption - check the docs for more info. -
The Channel Entries Tag has more Entries to return than the
limitthat is set -
You include code for the paging links using the
{paginate}variable pair
We have a couple options when it comes to adding the code for paging to our templates. Rather than duplicate what’s in the docs, just read this section here then come back. For simplicity, we’re going to use the first option, so:
-
Back in your
work/indextemplate, addpaginate="both"as a parameter to the{exp:channel:entries}opening tag
-
Right before the end of the closing
{exp:channel:entries}tag, add the simple{paginate}variable pair. We’ll go ahead and wrap the{pagination_links}single variable with a <div> so you have a way to style it:{paginate} <div class="paging">{pagination_links}</div> {/paginate} -
Refresh the
example.com/workpage in your browser and notice that our new ‘paging’ <div> is added both at the top and the bottom but looks kind of weird because it’s inline with all the other ‘col-4’ divs. So the solution here is to not declare our opening and closing ‘row’ divs outside the Channel Entries loop, but rather inside it and use conditionals to display the opening <div> at the top, but only for the first row returned - and the closing <div> at the bottom, but only for the last. Once we do that, ourwork/indextemplate should look like this:{layout="layouts/_wrapper"} <h1>Our Portfolio</h1> {exp:channel:entries channel="work" limit="3" paginate="both" orderby="date" sort="desc"} {if count == 1}<div class="row">{/if} <div class="col-4"> <h3><a href="{path='work/{url_title}'}">{title}</a></h3> <p><em>{entry_date format="%F %d %Y"}</em></p> {work_images limit="1"} <img src="{work_images:file}" alt="{work_images:caption}" /> {/work_images} {if client_name} <h3>{client_name}</h3> {/if} <p>{excerpt}</p> <p><a href="{path='work/{url_title}'}">Read More ></a></p> </div> {paginate} <div class="paging">{pagination_links}</div> {/paginate} {if count == total_results}</div>{/if} {/exp:channel:entries}
Our Work landing page is now displaying 3 Work entries per page and how many pages you see depend on
how many Entries you added. For now, I’m happy with the default output of the {paginate_links} single
variable, but like most tags in EE, there are parameters for this tag too that lets you customize how it works - it’s worth taking a look
at the docs.
NOTE: You can also set up paging to simply link to the next/previous pages using this code:
{paginate} {if previous_page} <a href="{auto_path}">Previous Page</a> {/if} {if next_page} <a href="{auto_path}">Next Page</a> {/if} {/paginate}and if you still want the individual page number links but need more granular control over the HTML output, you can do that too using the
{pagination_links}variable pair - check out the docs here.
Notice the pagination works - the URL of each of the ‘page’ links (i.e., for page 2, page 3, etc.) links to the same
URL as our main landing page, but with an added ‘pagination segment’ that always starts with a capital
P and then a number, where the number represents the number of items for the Channel Entries Tag to
‘offset.’ So in our example, page 2 links to the URL example.com/work/P3 which tells the
{exp:channel:entries} tag to skip the first 3 Entries in the loop and start from the 4th.
Now we have pagination working, and our Work landing page is still showing all of the Entries from the Work Channel (albeit only 3 per page). But we also want this landing page to give the user the ability to filter by category. With only a few Entries, it’s not that big of a deal, but imagine there were hundreds, and you can see how being able to filter would be useful.
Categories
To allow developers to build in such a way where the user to filter by a specific category when displaying Channel Entries, ExpressionEngine has a built-in method for doing this - the Category URL Segment. How it works is the rendering engine looks for a specific pair of additional segments and if present, recognizes those and knows to use them to filter the Channel Entries loop by a particular category.
NOTE: This only works if the Channel Entries Tag is being used ‘dynamically,’ which is why we had to remove
dynamic="no"when we copied this code from our Homepage.
By default, the Category URL Segment is category, but you can change this to whatever you want in
Settings > URL and Path Settings (or use the Jump Menu!) toward the bottom of the list.
By default, EE also expects the segment that follows the special category segment to be a category’s
ID, but because we want more descriptive URLs, we’re going to change that to use a category’s
title:
- Use
CMD/CTRL + Jthen type "url" and go to the URL and Path Settings page, then toward the bottom of the list under ‘Category URL,’ change the radio button so "Titles" is selected and save
So just by doing this and removing the dynamic="no" parameter, our work/index
template now supports dynamic category filtering with the URL structure of
example.com/work/category/graphic-design - the category in segment 3 can, of course, change and will
accept any category’s Category URL Title. Furthermore, pagination still works when a category is selected,
and the links automatically are updated if a category is selected, e.g.:
example.com/work/category/web-development/P3
However, we’re not quite done as users have no way of knowing how to get to the category listing pages yet. We still want to:
- Output links to the different categories for the users to easily be able to filter by category
- Customize our heading if we are filtering by category, so the users know what they’re viewing
Categories Links
To output the Category links, we use EE’s Categories Tag:
-
In the
work/indextemplate, let’s introduce a side-column using Bootstrap and move our{exp:channel:entries}inside the larger column and add an <h3> in the smaller column where our Category links will go:<div class="row"> <div class="col-md-3"> <h3>Categories</h3> ... </div> <div class="col-md-9"> {exp:channel:entries channel="work" limit="3" paginate="both" orderby="date" sort="desc"} {if count == 1}<div class="row">{/if} <div class="col-4"> <h3><a href="{path='work/{url_title}'}">{title}</a></h3> <p><em>{entry_date format="%F %d %Y"}</em></p> {work_images limit="1"} <img src="{work_images:file}" alt="{work_images:caption}" /> {/work_images} {if client_name} <h3>{client_name}</h3> {/if} <p>{excerpt}</p> <p><a href="{path='work/{url_title}'}">Read More ></a></p> </div> {paginate} <div class="paging">{pagination_links}</div> {/paginate} {if count == total_results}</div>{/if} {/exp:channel:entries} </div> </div> -
Under the <h3> in the smaller column, use the Categories Tag to loop through all the categories from
our Work Category Group and for each one, use the
{path}variable to set our links and we’ll use theshow_empty="no"parameter to only show categories with active entries:<h3>Categories</h3> {exp:channel:categories show_empty="no"} <p><a href="{path='work/index'}">{category_name}</a></p> {/exp:channel:categories}NOTE: Because the
{path}variable is inside the{exp:channel:categories}tag, it’s automatically outputting the category links based on the value (i.e.work/index) and the two settings inSettings > URL and Path Settingswe looked at earlier, so the links generated are likeexample.com/work/category/graphic-design. Outside the Categories Tag, this same{path}variable would render the link asexample.com/work
By default, the {exp:channel:categories} tag outputs a <ul> with the contents of the tag wrapped
in an <li> element and automatically nests these lists based if you’re using nested categories. If this output
isn’t what you need, you can also use the style="linear" parameter (docs) to get more granular
control of the output, but for our use, an unordered list is perfect.
Category Headings
Now the user has the ability to filter the list of portfolio items based on category, we want to dynamically update our page’s heading if there is a category selected. To do this, we use EE’s Category Heading tag, but only in the scenario we’re trying to filter by a specific category - ie, if segment 2 is "category" and segment 3 is actually present:
-
Replace our <h1> with the following:
{if segment_2 == "category" && segment_3} {exp:channel:category_heading channel="work"} <h1>Our Portfolio: {category_name}</h1> {if category_description} <p>{category_description}</p> {/if} {/exp:channel:category_heading} {if:else} <h1>Our Portfolio</h1> {/if}The Category Heading Tag also recognizes our special Category URL Segment pair and knows what category to output information for based on the third segment or the URL - so we can append the category name to our <h1> and output the category description if it’s been populated.
There we have it - our Work landing page is done and offers both category filtering and pagination. Notice that
pagination only shows if there’s more than 3 Entries and that honors the category selection. Again, in a real-world
scenario, your limit would be more like 12 or 15, but you can easy update that. So our final work/index
template looks like this:
{layout="layouts/_wrapper"}
{if segment_2 == "category" && segment_3}
{exp:channel:category_heading channel="work"}
<h1>Our Portfolio: {category_name}</h1>
{if category_description}
<p>{category_description}</p>
{/if}
{/exp:channel:category_heading}
{if:else}
<h1>Our Portfolio</h1>
{/if}
<div class="row">
<div class="col-md-3">
<h3>Categories</h3>
{exp:channel:categories show_empty="no"}
<a href="{path='work/index'}">{category_name}</a>
{/exp:channel:categories}
</div>
<div class="col-md-9">
{exp:channel:entries channel="work" limit="3" paginate="both" orderby="date" sort="desc"}
{if count == 1}<div class="row">{/if}
<div class="col-4">
<h3><a href="{path='work/{url_title}'}">{title}</a></h3>
<p><em>{entry_date format="%F %d %Y"}</em></p>
{work_images limit="1"}
<img src="{work_images:file}" alt="{work_images:caption}" />
{/work_images}
{if client_name}
<h3>{client_name}</h3>
{/if}
<p>{excerpt}</p>
<p><a href="{path='work/{url_title}'}">Read More ></a></p>
</div>
{paginate}
  <div class="paging">{pagination_links}</div>
{/paginate}
{if count == total_results}</div>{/if}
{/exp:channel:entries}
</div>
</div>
Work Entry Detail Pages
We’re really close now! The only pages we have left to build out are the individual ‘portfolio detail’ pages where each item from our Work Channel will have its own unique URL and display all our info from our Content Model.
The first thing we need to do is decide our URL and template structure, and we have a couple of options here.
Remember the default template routing looks at the first two segments in the URL and uses those to load a specific
Template (i.e., segment 2) from a specific Template Group (i.e., segment 1). So if we wanted to, we could utilize a
URL structure that looked like example.com/work/entry/sample-project-name and create a new
entry.html template within our work.group Template Group to keep the code for our ‘detail’
page in a totally separate template from our ‘listing page’. This is absolutely a legitimate strategy, but I
personally prefer a shorter URL, and so I’m going to proceed with the other option which is to use a URL structure
like example.com/work/sample-project-name and just continue to use our work/index template
making the necessary adjustments for that one template to not only handle the listings but also handle the
individual detail pages too. We even already set up the links to the individual Work Entry detail pages for this URL
structure when we built out the Homepage (and re-used it above when building out the Work listings page), so we just
need to update our work/index template to handle this.
Looking at our Work landing page as it stands now, we’ll go ahead re-use the layout we set up so that each ‘detail’ page also includes the smaller sidebar column with the Category links, but we’ll update the page’s heading so the <h1> is specific to the Work Entry we’re displaying.
So to extend our work/index template to handle ‘detail’ pages, we need to recognize when an individual
detail page is being requested. Looking at the URL structure we chose, if the second segment exists, but is
neither our special Category URL segment (ie category)
nor our paging segment (eg, P3), then we’re trying to load an individual
Entry using that Entry’s URL Title. The opening conditional tag to use for this is:
{if segment_2 && segment_2 !="category" && !(segment_2 ~ "/^P\d+/")}
NOTE: In the opening conditional tag above, I’m using the
!and~comparison operators in conjunction with parentheses since there is no operator for ‘does not match.’ You can use parentheses in conditionals to group conditions, just like you would with most programming languages. E.g.:{if (condition_1 && !condition_2) || (condition_1 && condition_3)}
The first thing we’ll do is update our page heading so if we’re looking at an individual Work Entry
detail page, we won’t output an <h1>, but instead just a paragraph that’s styled like one. To do this, we’ll
just extend the first conditional in the work/index template to also include an
{if:elseif ...} tag. We know the first condition will fail because we won’t have category
as the second segment and we still want the template to render the <h1> if our new condition checking for a
‘detail’ page fails too, so:
-
Replace the whole first conditional in the template to:
{if segment_2 == "category" && segment_3} {exp:channel:category_heading channel="work"} <h1>Our Portfolio: {category_name}</h1> {if category_description} <p>{category_description}</p> {/if} {/exp:channel:category_heading} {if:elseif segment_2 && segment_2 !="category" && !(segment_2 ~ "/^P\d+/")} <p class="h1">Our Portfolio</p> {if:else} <h1>Our Portfolio</h1> {/if} -
Next, in the
work/indextemplate, add the conditional inside our ‘col-md-9’ div and move the entire{exp:channel:entries}tag to only execute if the condition is not true:<div class="col-md-9"> {if segment_2 && segment_2 !="category" && !(segment_2 ~ "/^P\d+/")} {!-- This is where our 'detail' page code will go! --} {if:else} {exp:channel:entries channel="work" limit="3" paginate="both" orderby="date" sort="desc"} {!-- Code stripped for tutorial legibility. Don't change yours! --} {/exp:channel:entries} {/if} </div>NOTE: Comments in EE Templates are wrapped with
{!--and--}- anything between these will be completely ignored by the rendering engine. -
Inside the conditional, if the condition is true, add a new
{exp:channel:entries}tag that will be used to output the individual Entry details. This time, we need to use theurl_titleparameter and use what’s in the second segment to identify the individual Entry and for output, we’ll just add an <h1> with the Entry Title for now:{if segment_2 && segment_2 !="category" && !(segment_2 ~ "/^P\d+/")} {!-- Work Entry detail page --} {exp:channel:entries channel="work" limit="1" url_title="{segment_2}"} <h1>{title}</h1> {/exp:channel:entries} {if:else} ... -
Now try going to any individual Work Entry’s detail page, e.g.:
example.com/work/sample-project-name- you should see the same page layout as our Work landing page, but instead of the multiple Entries being listed in the main column, you should see the Title of your individual entry. And the text "Our Portfolio" should just be a <p> styled to look like a heading 1.
From a templating point of view, that’s pretty much it - this one template now can handle all listings and category-specific listings (both with pagination) and now can also output individual Entry detail pages all by looking at what’s in the URL and acting accordingly!
We just need to finish building out our ‘detail’ page code by adding the rest of the Fields so we can output all our Work Entry data:
-
Build out the Work Entry detail page
{exp:channel:entries}tag, just like we did for the Homepage and Contact page, by systematically going through the Fields available to the Channel and building out each one:-
For the page’s heading, we can re-use the code from the About or Services pages because we’re also
using the Page Heading field in our Work Channel:
<h1>{if page_heading}{page_heading}{if:else}{title}{/if}</h1> -
Client Name is a Text Input field, so needs surrounding HTML if we want to
make it a heading, but it’s also not required so we need to check for it first:
{if client_name}<h2>{client_name}</h2>{/if} -
Entry Date is one of EE’s default fields an is a Date field, which we can
add formatting
to:
<h3>{entry_date format="%F %d %Y"}</h3> -
Project Description is a Rich Text field so has it’s own HTML in the output
so we can just drop it in as a single variable:
{project_description} -
Work Images is File Grid** field that hold multiple images - we’ll display these using a
different Bootstrap feature to be different to the Homepage - this time, we’ll output the
‘thumbnail’ Manipulation of our image on the page and link that to the ‘large’ version but inside a
Bootstrap Modal:
{work_images} {if work_images:count == 1} <h2>Gallery <small>(click to enlarge)</small></h2> <div class="row gallery"> {/if} <a class="col-4" href="#" data-toggle="modal" data-target="#exampleModal"> <img src="{work_images:file:thumbnail}" alt="{work_images:caption}" /> </a> <div class="modal fade" id="exampleModal" tabindex="-1" role="dialog" aria-labelledby="exampleModalLabel" aria-hidden="true"> <div class="modal-dialog modal-xl"> <div class="modal-content"> <div class="modal-header"> <button type="button" class="close" data-dismiss="modal" aria-label="Close"> <span aria-hidden="true">×</span> </button> </div> <div class="modal-body text-center"> <img src="{work_images:file:large}" alt="{work_images:caption}" /> {if work_images:caption}<br /><caption>{work_images:caption}</caption>{/if} </div> </div> </div> </div> {if work_images:count == work_images:total_rows} </div> {/if} {/work_images} -
Link is a URL field and again not required. The data held in a URL field is
literally just a URL, so we have to add the appropriate surrounding HTML:
{if link}<p><a class="button" href="{link}" target="_blank">View the Results</a></p>{/if} -
In an individual Entry, you can output any Categories it’s assigned to using the
{categories}variable pair within the Channel Entries Tag:<p> <strong>Categories: </strong> {categories backspace="2"}<a href="{path='work/index'}">{category_name}</a>, {/categories} </p>Notice the
backspace="2"parameter here - this is a handy parameter available to most EE tag pairs that removes a set number of characters (in this case, 2) from the end of the code only during the last time through the loop. So here we’re adding a comma and space after each category link except for the last one.
-
For the page’s heading, we can re-use the code from the About or Services pages because we’re also
using the Page Heading field in our Work Channel:
Putting all of this together, we have our final work/index template and we are done with our Work
section! Here’s our final code:
{layout="layouts/_wrapper"}
{if segment_2 == "category" && segment_3}
{exp:channel:category_heading channel="work"}
<h1>Our Portfolio: {category_name}</h1>
{if category_description}
<p>{category_description}</p>
{/if}
{/exp:channel:category_heading}
{if:elseif segment_2 && segment_2 !="category" && !(segment_2 ~ "/^P\d+/")}
<p class="h1">Our Portfolio</p>
{if:else}
<h1>Our Portfolio</h1>
{/if}
<div class="row">
<div class="col-md-3">
<h3>Categories</h3>
{exp:channel:categories show_empty="no"}
<a href="{path='work/index'}">{category_name}</a>
{/exp:channel:categories}
</div>
<div class="col-md-9">
{if segment_2 && segment_2 !="category" && !(segment_2 ~ "/^P\d+/")}
{!-- Work Entry detail page --}
{exp:channel:entries channel="work" limit="1" url_title="{segment_2}"}
<h1>{if page_heading}{page_heading}{if:else}{title}{/if}</h1>
{if client_name}<h2>{client_name}</h2>{/if}
<h3>{entry_date format="%F %d %Y"}</h3>
{project_description}
{work_images}
{if work_images:count == 1}
<h2>Gallery <small>(click to enlarge)</small></h2>
<div class="row gallery">
{/if}
<a class="col-4" href="#" data-toggle="modal" data-target="#exampleModal">
<img src="{work_images:file:thumbnail}" alt="{work_images:caption}" />
</a>
<div class="modal fade" id="exampleModal" tabindex="-1" role="dialog" aria-labelledby="exampleModalLabel" aria-hidden="true">
<div class="modal-dialog modal-xl">
<div class="modal-content">
<div class="modal-header">
<button type="button" class="close" data-dismiss="modal" aria-label="Close">
<span aria-hidden="true">×</span>
</button>
</div>
<div class="modal-body text-center">
<img src="{work_images:file:large}" alt="{work_images:caption}" />
{if work_images:caption}<br /><caption>{work_images:caption}</caption>{/if}
</div>
</div>
</div>
</div>
{if work_images:count == work_images:total_rows}
</div>
{/if}
{/work_images}
{if link}<p><a class="button" href="{link}" target="_blank">View the Results</a></p>{/if}
<p>
  <strong>Categories: </strong>
  {categories backspace="2"}<a href="{path='work/index'}">{category_name}</a>, {/categories}
</p>
{/exp:channel:entries}
{if:else}
{!-- Work landing/listing page --}
{exp:channel:entries channel="work" limit="3" paginate="both" orderby="date" sort="desc"}
{if count == 1}<div class="row">{/if}
<div class="col-4">
<h2><a href="{path='work/{url_title}'}">{title}</a></h2>
<p><em>{entry_date format="%F %d %Y"}</em></p>
{work_images limit="1"}
<img src="{work_images:file}" alt="{work_images:caption}" />
{/work_images}
{if client_name}
<h3>{client_name}</h3>
{/if}
<p>{excerpt}</p>
<p><a href="{path='work/{url_title}'}">Read More ></a></p>
</div>
{paginate}
<div class="paging">{pagination_links}</div>
{/paginate}
{if count == total_results}</div>{/if}
{/exp:channel:entries}
{/if}
</div>
</div>
Again, we’ve deliberately not spent much time on styling, but I trust this tutorial has given you the foundations you need to start building in ExpressionEngine.
What’s Next?
We can still do a few more things to improve our code - things that you’d want to do for a production site, so stick with me for one more chapter.
Comments 0
Be the first to comment!