Advanced RTE Configurations - JavaScript
In addition to being able to add custom CSS to an RTE field, it is also possible to add custom JavaScript to an RTE field when using Redactor. This is particularly useful when adding custom plugins. For this example, we’re going to add a button to our Redactor toolbar, which will prompt the user for text and then add a danger alert box when clicked.
Using custom JS with CKEditor is a little more complicated so we will not cover that here. Be sure to check out the ExpressionEngine docs if you need to add custom JS to CKEditor.
Create the JS Template
Start by creating a new template in the Template Editor and selecting “JavaScript” as the type.

In our template, we will slightly modify the “Sample plugin with modal window” demo plugin from Imperavi.
(function($R)
{
$R.add('plugin', 'warningAlert', {
modals: {
'warningAlert': '<form action="">'
+ '<div class="form-item">'
+ '<label>## warningAlert-label ##</label>'
+ '<textarea name="text" style="height: 200px;"></textarea>'
+ '</div>'
+ '</form>'
},
translations: {
en: {
"warningAlert": "Add A Warning",
"warningAlert-label": "Please, type some text"
}
},
init: function(app)
{
// define app
this.app = app;
// define services
this.lang = app.lang;
this.toolbar = app.toolbar;
this.insertion = app.insertion;
},
// messages
onmodal: {
warningAlert: {
opened: function($modal, $form)
{
$form.getField('text').focus();
},
insert: function($modal, $form)
{
var data = $form.getData();
this._insert(data);
}
}
},
// public
start: function()
{
// create the button data
var buttonData = {
title: this.lang.get('warningAlert'),
api: 'plugin.warningAlert.open'
};
// create the button
var $button = this.toolbar.addButton('warningAlert', buttonData);
},
open: function()
{
var options = {
title: this.lang.get('warningAlert'),
width: '600px',
name: 'warningAlert',
handle: 'insert',
commands: {
insert: { title: this.lang.get('insert') },
cancel: { title: this.lang.get('cancel') }
}
};
this.app.api('module.modal.build', options);
},
// private
_insert: function(data)
{
this.app.api('module.modal.close');
if (data.text.trim() === '') return;
this.insertion.insertHtml('<div class="alert"><span class="closebtn" onclick="this.parentElement.style.display=\'none\'\;">×</span><strong>Danger!</strong> '+ data.text +'</div>');
}
});
})(Redactor);
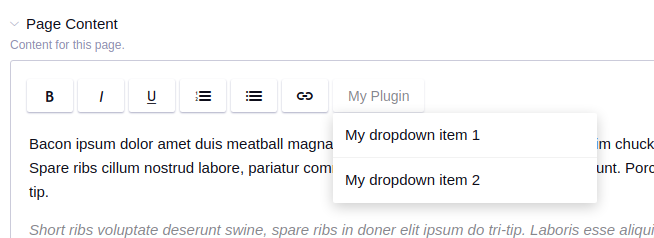
This plugin will create a button on our field with the label of “Add A Warning”. When the user clicks the button, a modal appears with a textarea for the user to input the text to be displayed in the warning alert box. Once submitted the text wrapped in our HTML and inserted into the field using Redactor’s insertHtml() service.
Learn more about creating Redactor plugins
Note that we have also added these custom styles to our RTE stylesheet using the steps in the first half of this article. To follow along, the styles for this alert box are:
.alert {
  padding: 20px;
  background-color: #f44336;
  color: white;
}

.closebtn {
  margin-left: 15px;
  color: white;
  font-weight: bold;
  float: right;
  font-size: 22px;
  line-height: 20px;
  cursor: pointer;
  transition: 0.3s;
}

.closebtn:hover {
  color: black;
}
Configure RTE
Now that we have our JS template, we can configure our RTE toolset.
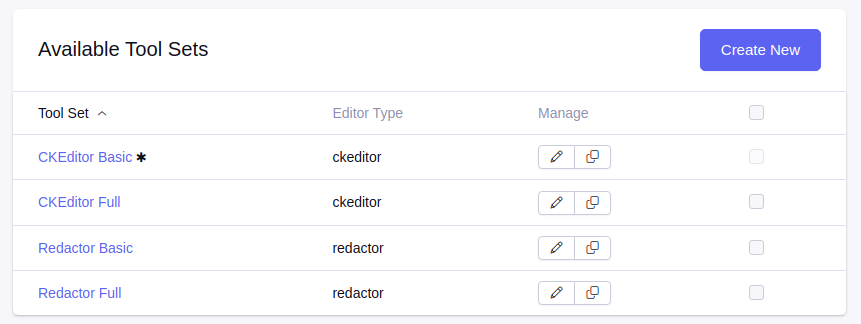
To do this, select the RTE configuration you would like to edit by navigating to the Rich Text Editor add-on, then selecting the configuration you want to edit from the “Available Tool Sets” section. Again, be sure to choose a toolset based on Redactor for our example.
Next, we will toggle on “Advanced configuration.” Activating the advanced configuration will reveal the “Configuration JSON” field, which is being pre-populated with JSON config based on the currently saved configuration as well as the “Extra Javascript” dropdown.
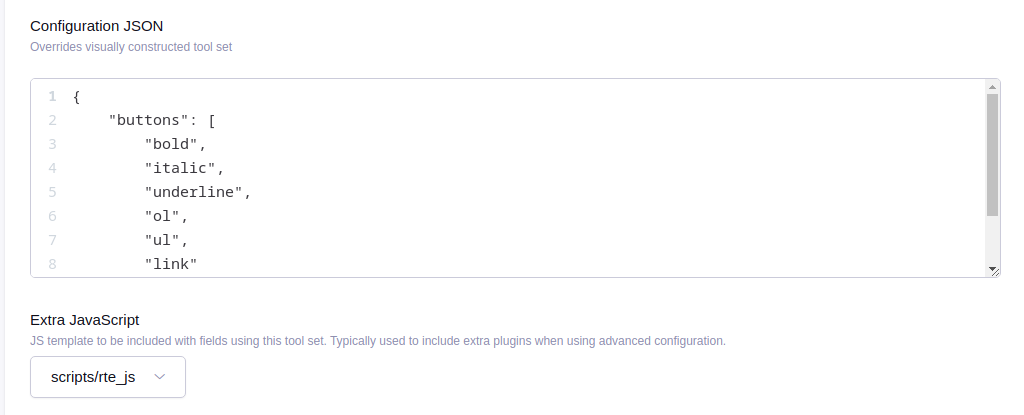
In the Configuration JSON field, we will add our plugin to the list of plugins (from the sample code we used we know our plugin is labeled warningAlert):
{
    "buttons": [
        "bold",
        "italic",
        "underline",
        "ol",
        "ul",
        "link"
    ],
    "plugins": [
        "warningAlert"
    ]
}
Now in the Extra JavaScript field, we will select our JavaScript template created above.

Using Your Configuration
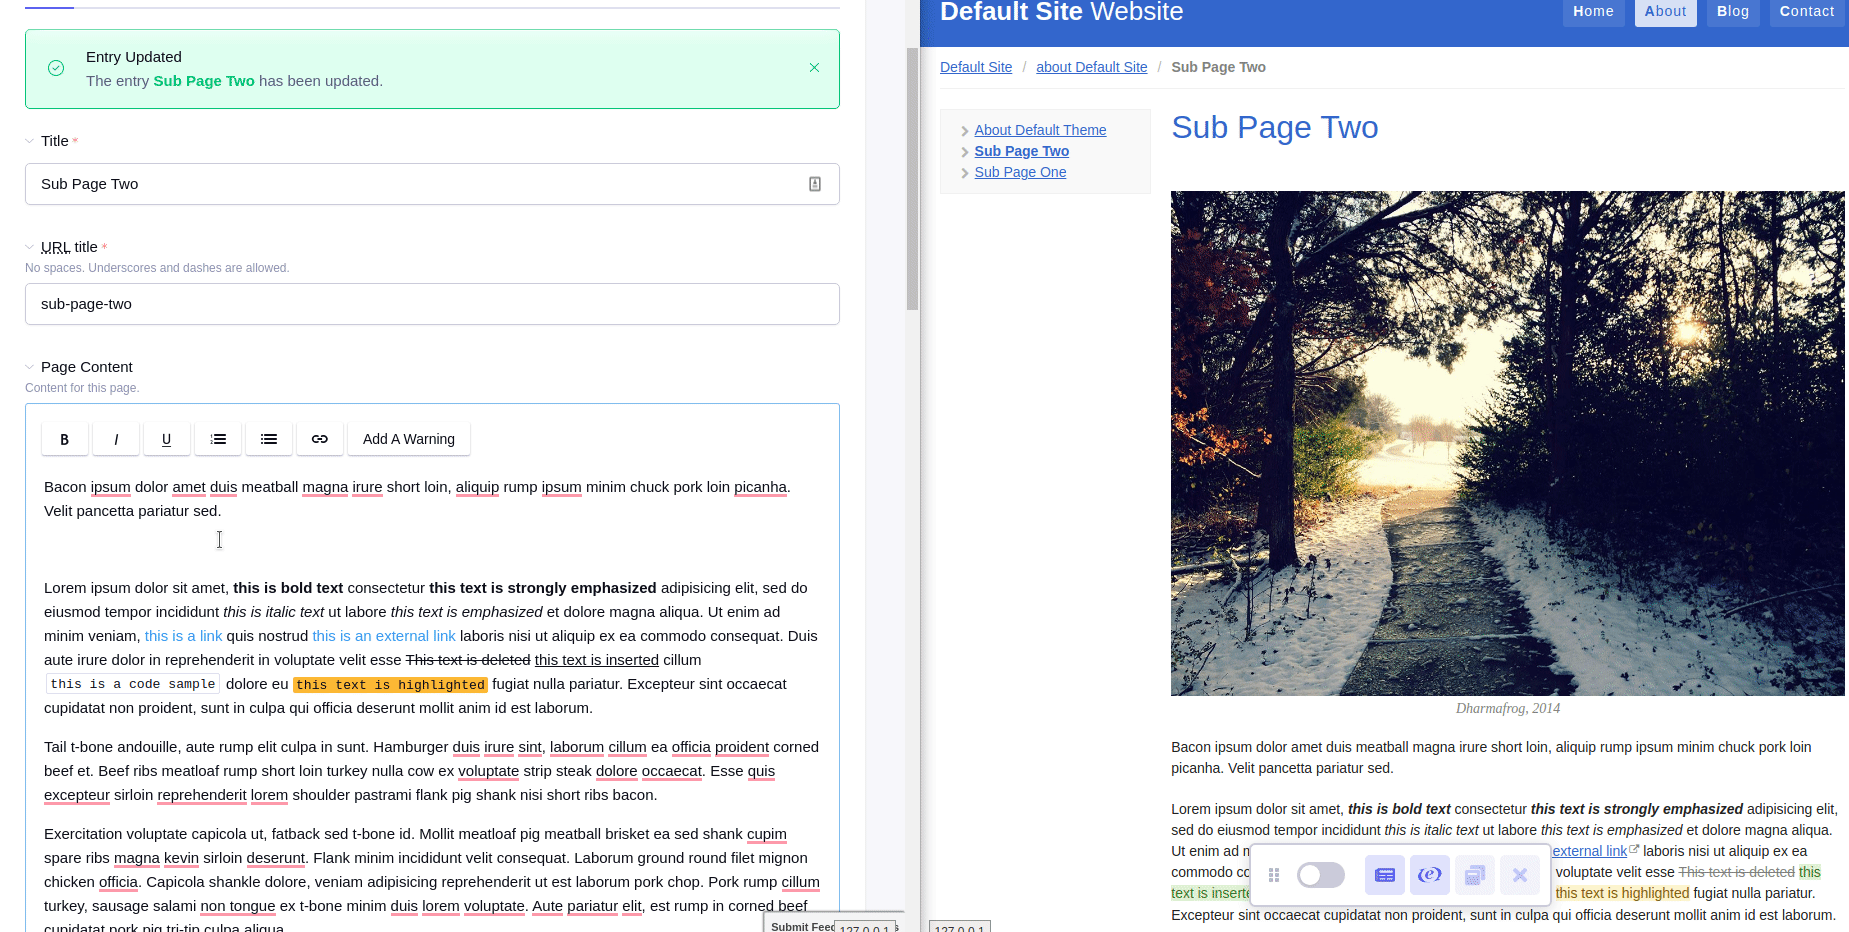
Now that your custom configuration and plugin are saved, our button is available when editing your field in an entry.

Comments 2
gigantic
This isn’t working for me. I’m getting Rte is undefined error on the entry page that the field is active on.
kchatel
I’ve tried this exact demo and I’m also getting an error.