Searching with Low Search
Series Introduction
This is a three-part series on how we have built the searching/filtering and Favorites feature in our own Add-on Store. While we're not going to build the exact same thing, the basic logic and template code will be very similar.
- In Part 1 of this series, we will build our templates and cover the foundation of how we are using Low Search to provide search input, filters, and results.
- In Part 2, we will use some AJAX magic to make the experience a little more convenient for our users.
- In Part 3, we're going to use EE Harbor's Favorites add-on (with some AJAX magic) to allow users to choose their favorite add-ons to reference later.
Notes:
- We're going to be using the default theme as a starting point.
- To make styling components easier, we're going to be using Tailwind CSS.
- We're using vanilla Javascript. A lot of the Javascript could be done in fewer lines if using a library like JQuery. However, for the sake of making this work almost anywhere, we're sticking to the basics.
- This is an intermediate-level tutorial, so we're expecting that you are pretty familiar with ExpressionEngine and can fill in many of the holes in this tutorial yourself. Also, there are always more ways to do things. The method here is just a setup I've used many times and has worked for me. Always feel free to comment or start a thread in the forums if you need help in any way or have a way to improve what I have here.
In This Article
The Flow
I'm a big fan of architecting my solution before writing code. This can be done with pseudo-code or with flowcharts. In this example, the flow is pretty straightforward:
- The user will input their keywords, select the sort order, select any checkboxes for filters, and submit their search.
- Results will be shown on a new page to the user.
1. The Schema
The first step is to, of course, set up our channel and data in ExpressionEngine.
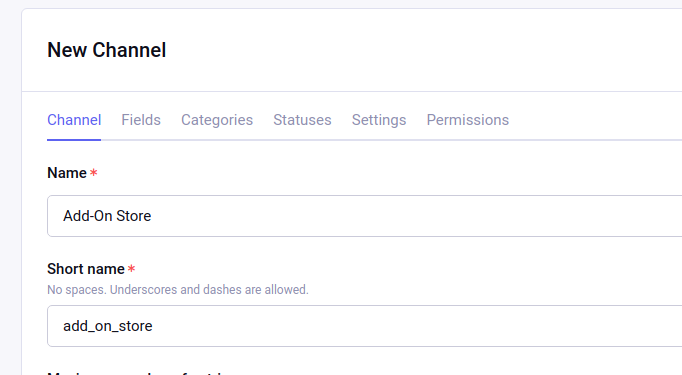
- Create a new channel.
- Name: Add-on Store
- Short Name: add_on_store
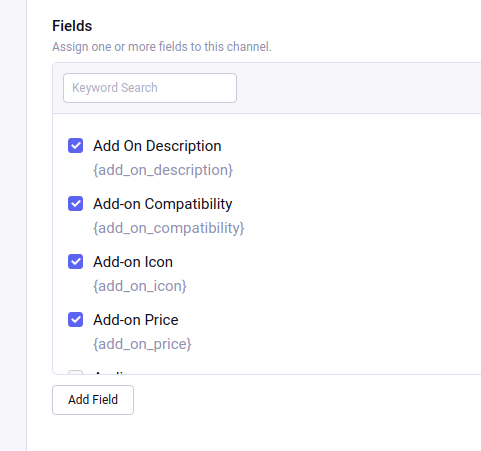
- Create some fields and add them to your new channel
(Fieldtype | Name | Short name).- File | Add-on On Icon | add_on_icon
- Textarea | Add On Description | add_on_description
- Input | Add-on Price | add_on_price
- Multi Select | Add-on Compatibility | add_on_compatibility (with options 1-6)

- Categories
To make things easy we're just going to create a few categories in a group called "Add-ons" (make sure to add that group to your Add-on Store channel):- Forms
- Membership
- SEO

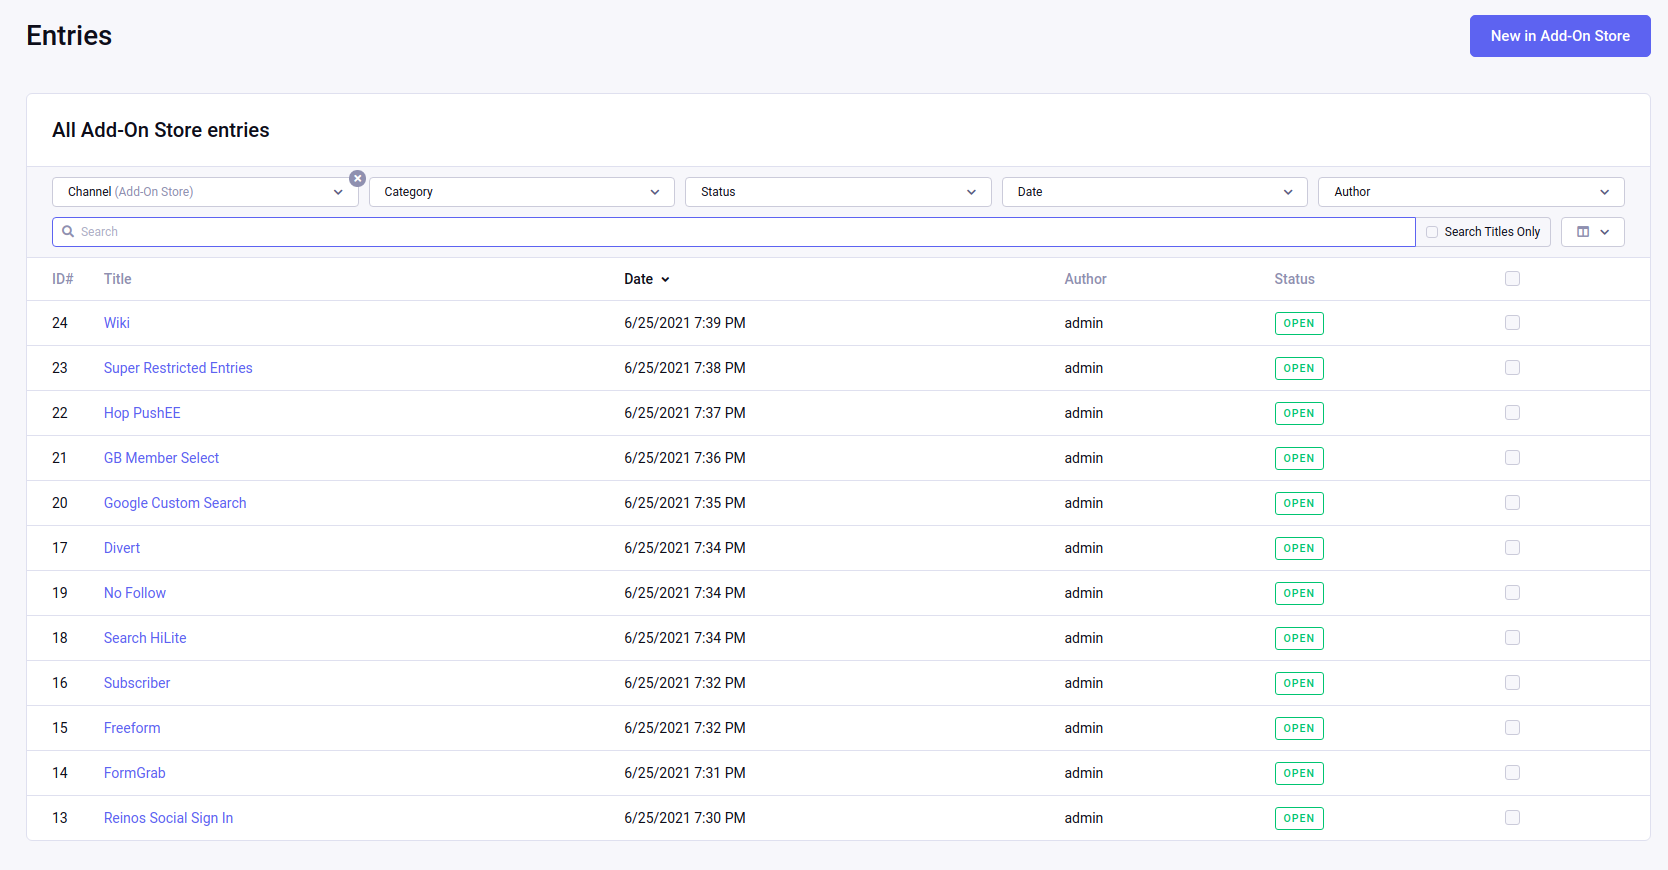
- Create some entries
2. Installing Low Search
For this to work as expected, we need to first download and install Low Search and then update some settings.
- Purchase and install Low Search from EEHarbor.com.
- Since we want to use the keyword search, we also need to set up a Collection in Low Search.
- Collection Label: Add-on Store
- Collection Name: add_on_store
- Channel: Add-on Store
- make sure to add weight to your searchable fields.

Key Concepts
- Low Search Collections: https://gotolow.com/.../collections
3. Creating Our Templates
Now we're ready to connect everything together in the templates. This could be done with one template, but I'll let you figure that out on your own if you so desire. To make this tutorial easier to follow we are going to use two separate templates:
- A template where users land and can start a search (
/addons) - A results page (
/addons/results)
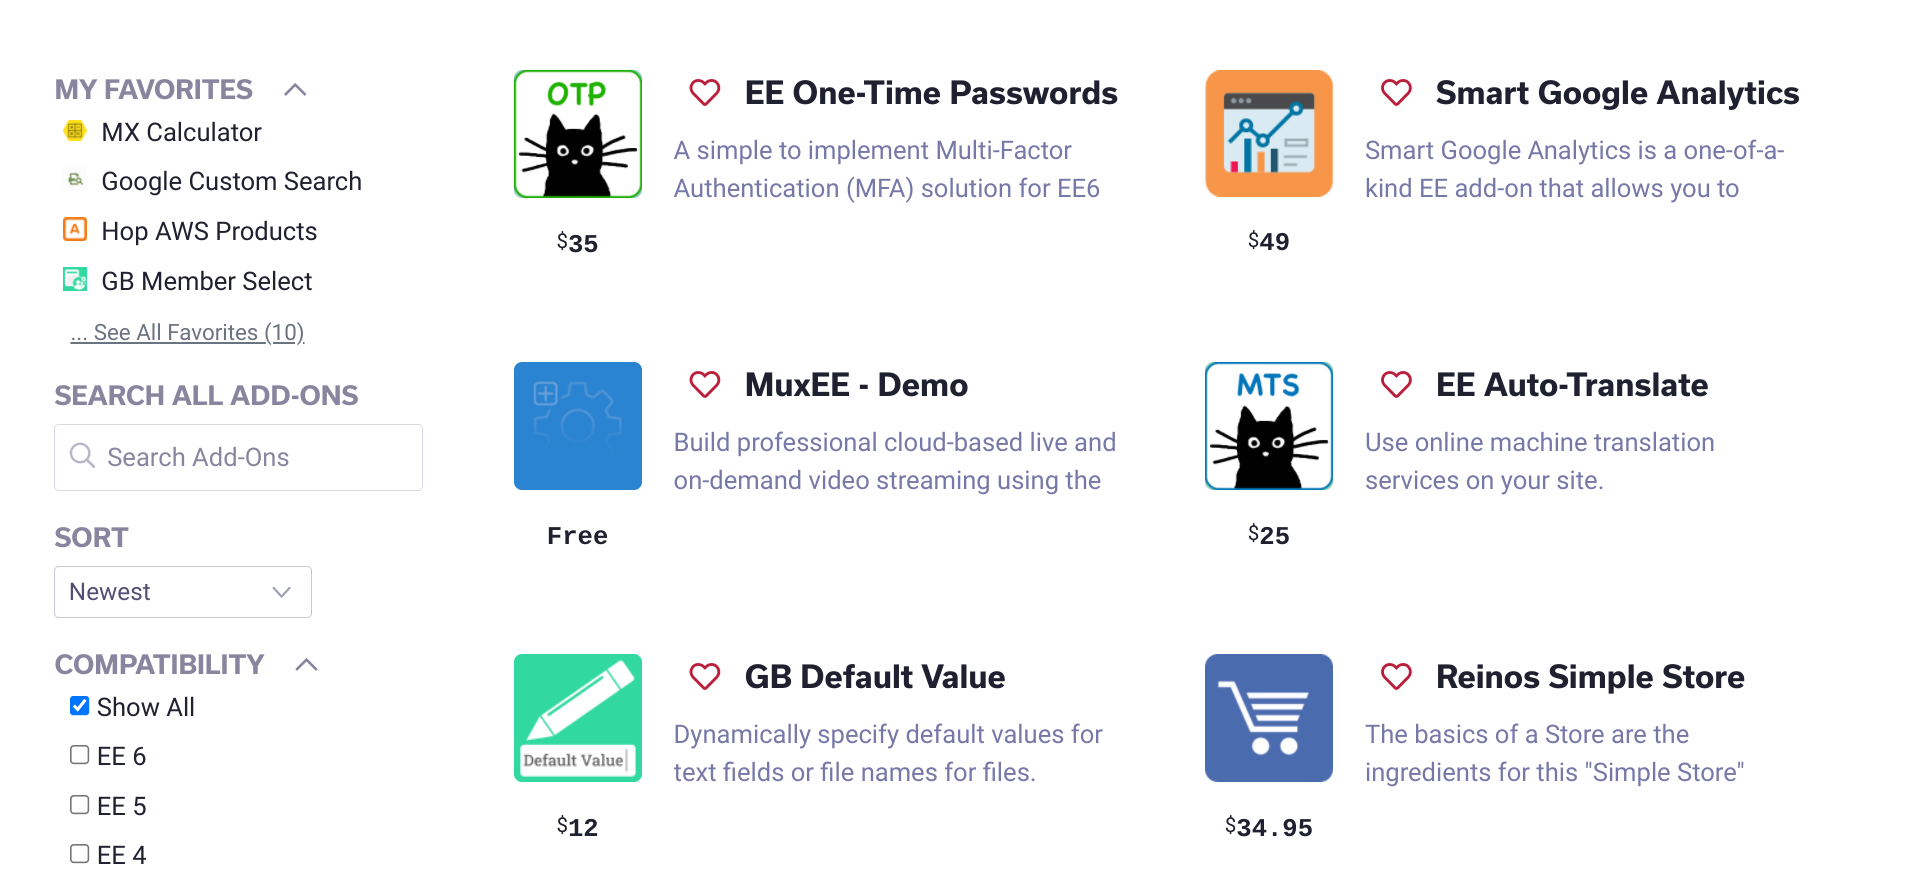
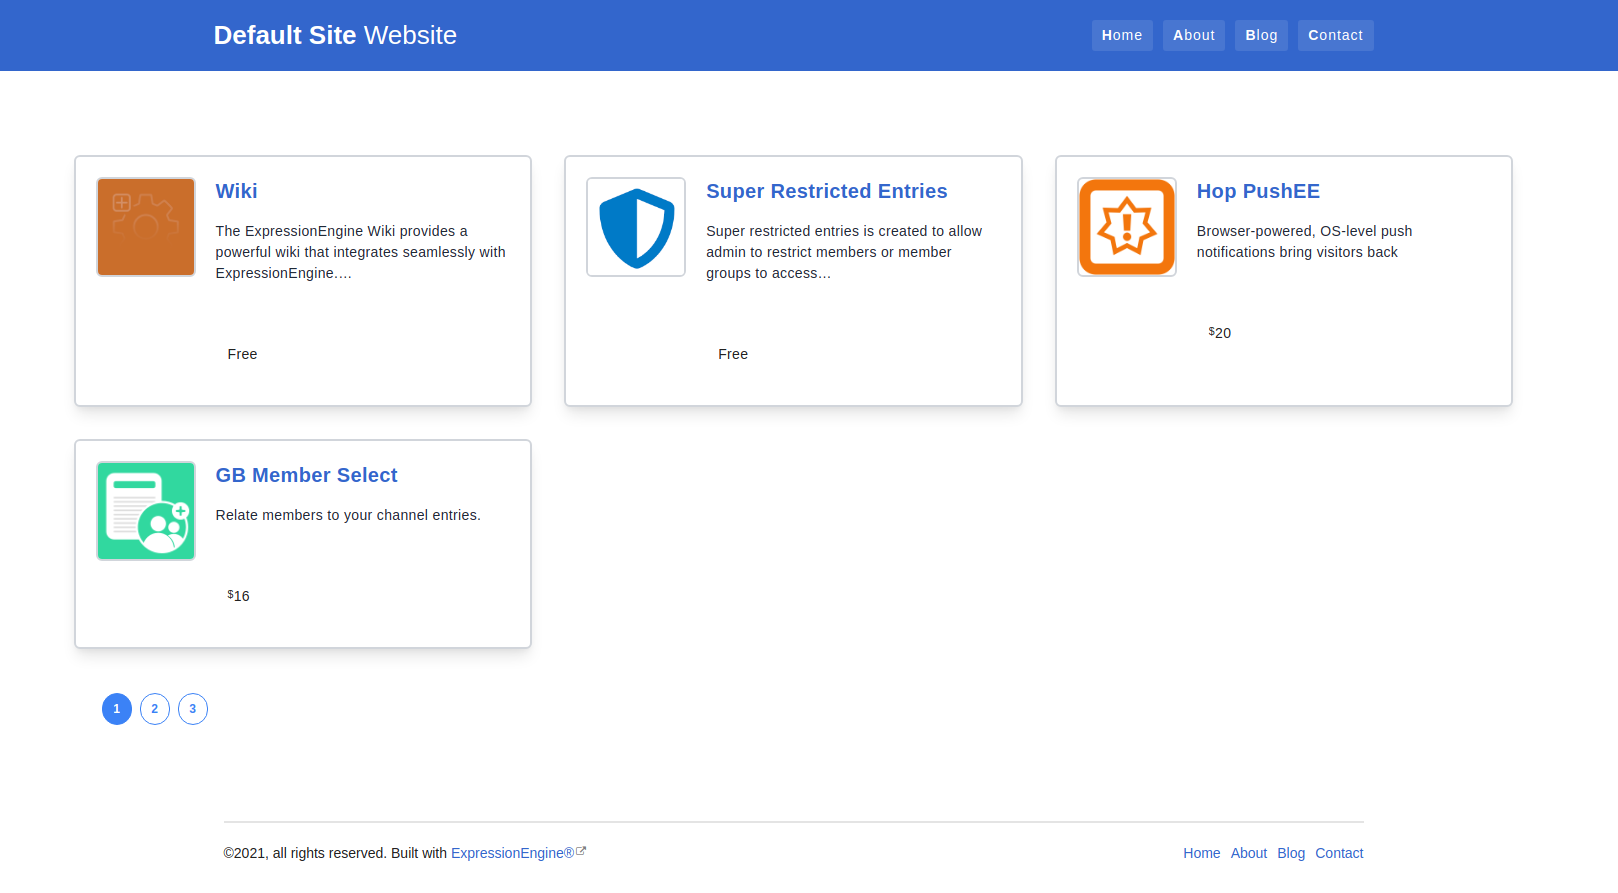
Initial Landing Page With Results
To start, the users will land on a page which will present them with an initial set of results.
Since we're using the default theme that comes with ExpressionEngine, we will use the
html-wrappertemplate included with the theme. Remember that when using layouts, the{layout ...}tag should always come first in your template.{layout='layouts/_html-wrapper'}We'll first use a Low Search results tag pair to show an initial set of results. You can also just simply use a native
{exp:channel:entries}. However, for now, we'll use{exp:low_search:results}to keep everything in Low Search and make it easier to break this up into reusable components in following lessons.- Don't forget a message to the user if there are no results. This lets the user know that they didn't do anything wrong, there are simply no results. To do this, we'll use the
{if low_search_no_results}conditional . - For each result found we're going to display a card on the page with information and a link to the results' individual entry page.
- Within our
low_search_resultstag pair, we want to include our pagination code, just like you would for native ExpressionEnginechannel:entries - Make sure to close out all tags and divs.
    {exp:low_search:results
        channel='add_on_store' //only show entries from the addon store
        limit='4' // limiting results to only 4 per page
        paginate="bottom" // show pagniation at the bottom of the results
    }
{!-- if no results, let the user know --}
{if low_search_no_results}
    <div class="alert alert--empty">No Add-ons</div>
{/if}
{!-- the card used to display the add-on information --}
{!-- Tailwind card component source: https://tailwindcomponents.com/component/quote-card-with-image-1 --}
    <div class=" flex flex-col my-1 px-1 w-full md:w-1/2 lg:my-4 lg:px-4 lg:w-1/3">
        <div class="max-w-2xl bg-white border-2 border-gray-300 p-5 rounded-md tracking-wide shadow-lg flex-1">
                <div id="header" class="flex">
                    <img alt="addon icon" class="rounded-md border-2 border-gray-300" style="width:100px;height:100px;" src="{add_on_icon}"/>
                    <div id="body" class="flex flex-col ml-5">
                        <h4 id="name" class="text-xl font-semibold mb-2">{title}</h4>
                        <p id="job" class="text-gray-800 mt-2">{add_on_description:limit characters='100'}</p>
                        <div class="flex mt-5">
                        <p class="ml-3">
                            {if add_on_price == '0'}
                                Free
                            {if:else}
                                <sup>$</sup>{add_on_price}
                            {/if}
                        </p>
                    </div>
                </div>
            </div>
        </div>
    </div>
{paginate}
    <div class="container py-2">
        <nav class="block">
            <ul class="flex pl-0 rounded list-none flex-wrap">
                {pagination_links}
                    {first_page}
                    <li>
                        <a href="{pagination_url}" class="first:ml-0 text-xs font-semibold flex w-8 h-8 mx-1 p-0 rounded-full items-center justify-center leading-tight relative border border-solid border-blue-500 {if current_page}text-white bg-blue-500{if:else}bg-white text-blue-500{/if}" style="width:30px;">
                        {pagination_page_number}
                        </a>
                    </li>
                    {/first_page}

                    {page}
                    <li>
                        <a href="{pagination_url}" class="first:ml-0 text-xs font-semibold flex w-8 h-8 mx-1 p-0 rounded-full items-center justify-center leading-tight relative border border-solid border-blue-500 {if current_page}text-white bg-blue-500{if:else}bg-white text-blue-500{/if}" style="width:30px;">
                        {pagination_page_number}
                        </a>
                    </li>
                    {/page}

                    {last_page}
                    <li>
                        <a href="{pagination_url}" class="first:ml-0 text-xs font-semibold flex w-8 h-8 mx-1 p-0 rounded-full items-center justify-center leading-tight relative border border-solid border-blue-500 {if current_page}text-white bg-blue-500{if:else}bg-white text-blue-500{/if}" style="width:30px;">
                        {pagination_page_number}
                        </a>
                    </li>
                    {/last_page}
                {/pagination_links}
            </ul>
        </nav>
    </div>
{/paginate}
Link To Current Template Code:
addons/index: https://raw.githubusercontent.com/ops-andy/eeu-search-favorite-tutorial/main/01-search-landing-page.html
Key Concepts
- Low Search Results Tag: https://gotolow.com/...#results-tag
- Template Layouts: https://docs.expressionengine.com/.../layouts.html
- Low Search No Results: Alternative syntax to the natvie ExpressionEngine
{no_results}conditional. https://gotolow.com/.../tags#search-tag-variables - Template Pagination: Within our Low Search results tag, we can use ExpressionEngine's native template pagination. https://docs.expressionengine.com/.../pagination.html
Add Search Functions
Now that we have our initial results set let's add our search functions. To do this, we'll split the page into two columns (search functions and results).
Our goals for the search functionality are:
- The ability to search add-ons by keyword.
- The ability to sort add-ons by date added, recent updates, and name.
- Filter results based on ExpressionEngine version compatibility.
- Filter results based on Categories.
- We will need
{exp:low_search:form}tag to open a search form with Low Search.{exp:low_search:form result_page="addons/results" //where users will be taken after submitting the search form_id="addon_filter" //an ID to identify this form query="{segment_3}" } - Keywords: Low Search makes searching by keyword reasonably easy.
<input type="text" name="keywords" //important for Low Search to recognize this as a keyword search class="search-input__input" placeholder="Search Add-Ons" > - Sort: Low Search once again makes this easy with the
orderby_sortfilter.<select name="orderby_sort" class="filter-bar__item" id="searchResultsSortSelect"> {!-- <option value="name-az">Sort By</option> --} <option value="date|desc">Newest</option> <option value="date|asc">Oldest</option> <option value="edit_date|desc">Recently Updated</option> <option value="title|asc">Name: A–Z</option> <option value="title|desc">Name: Z–A</option> </select> - Compatibility: Compatibility search is a little more complicated as we are using a custom multi-select fieldtype and want the user to be able to choose multiple options, including a "Show All" option. In much the same way you submit a checkbox type field where multiple options are allowed with HTML and PHP, you use an the Low Search Field Search as an array:
search:add_on_compatibility[]<ul class="sidebar__list" id="addon-compatibility-filters" > <li> <input type="checkbox" name="show-all-compatibility" id="show-all-compatibility" data-action="show-all-compatibility" onclick="showAll('search:add_on_compatibility[]',this.id)" value="" /> <label for="show-all-compatibility">Show All</label> </li> <li> <input type="checkbox" name="search:add_on_compatibility[]" data-action-uncheck="show-all-compatibility" id="EE6" value="6" /> <label for="EE6">EE 6</label> </li> <li> <input type="checkbox" name="search:add_on_compatibility[]" data-action-uncheck="show-all-compatibility" id="EE5" value="5" /> <label for="EE5">EE 5</label> </li> <li> <input type="checkbox" name="search:add_on_compatibility[]" data-action-uncheck="show-all-compatibility" id="EE4" value="4" /> <label for="EE4">EE 4</label> </li> <li> <input type="checkbox" name="search:add_on_compatibility[]" data-action-uncheck="show-all-compatibility" id="EE3" value="3" /> <label for="EE3">EE 3</label> </li> <li> <input type="checkbox" name="search:add_on_compatibility[]" data-action-uncheck="show-all-compatibility" id="EE2" value="2" /> <label for="EE2">EE 2</label> </li> <li> <input type="checkbox" name="search:add_on_compatibility[]" data-action-uncheck="show-all-compatibility"" id="EE1" value="1" /> <label for="EE1">EE 1</label> </li> </ul> </div>If we want to show add-ons that are compatible with any version, then we need to make sure
search:add_on_compatibility[]array is blank. To ensure that, we'll use some JavaScript when the user clicks on "Show All".
For "Show All" input, we'll add anonclickproperty:And the Javascript. To uncheck all boxes in a section when Show All is clicked:<li> <input type="checkbox" name="show-all-compatibility" id="show-all-compatibility" data-action="show-all-compatibility" onclick="showAll('search:add_on_compatibility[]',this.id)" value="" /> <label for="show-all-compatibility">Show All</label> </li>To uncheck the Show All option when a specific option is checked://uncheck all boxes with given name when box with specified ID is checked function showAll(cn,cbId){ //we're calling this when a checkbox is clicked. So we first need to see //if this action is checking or unchecking the checkbox if (document.getElementById(cbId).checked){ //let's get all the elements with the same name attribute we passed in var cbarray = document.getElementsByName(cn); //for each page element we find we're going to uncheck those boxes. for(var i = 0; i < cbarray.length; i++){ if (cbarray[i] != document.getElementById(cbId)){ cbarray[i].checked = false; } } } }// when the dom loads, we're going to bind a change event listener to each // element that matches our query. const filterAccordions = document.querySelectorAll('.filter-accordion'); filterAccordions.forEach(filterAccordions =>{ let filterCheckbox = filterAccordions.querySelectorAll('[data-action-uncheck]'); filterCheckbox.forEach(filterBox => { filterBox.addEventListener('change', event => { var showAllFilter = filterBox.getAttribute("data-action-uncheck"); //uncheck the matching Show All checkbox document.getElementById(showAllFilter).checked = false; }) }) }); - Categories: Similar to the Compatibility, we will allow the user to select multiple Categories or All Categories.
Here we are going to us the
{channel:categories}tag to list all categories used in the "Add-On Store" channel combined with the Low Search Categories filter:We've already created the JavaScript for the Show All option above, so we don't need to rewrite it here.<ul class="sidebar__list" id="addon-category-filter" > <li> <input type="checkbox" name="category[]" id="show-all-categories" onclick="showAll('category[]',this.id)" value="" /> <label for="show-all-categories">Show All</label> </li> {exp:channel:categories channel='add_on_store' parent_only='yes' style='linear' show_empty='no' status='not closed'} <li> <input type="checkbox" name="category[]" id="{category_url_title}" data-action-uncheck="show-all-categories" value="{category_id}" /> <label for="{category_url_title}">{category_name}</label> </li> {/exp:channel:categories} </ul> - Now, we need a Submit button.
<button type="submit" class="bg-blue-500 hover:bg-blue-700 text-white font-bold py-2 px-4 rounded">Submit</button> - Next, let's add this form to our landing page. We're simply going to use some widths and
inline-blockto align these two columns. This will give us a template like so:
Link To Current Template Code:
Updated
addons/indexwith search functions: https://raw.githubusercontent.com/ops-andy/eeu-search-favorite-tutorial/main/01-search-landing-page-with-functions.html
Key Concepts
- Low Search Form Tag: https://gotolow.com/...#form-tag
- Low Search Form Tag: <a target="_BLANK" https://gotolow.com/addons/low-search/docs/tags#keywords-tag">https://gotolow.com/...#keywords-tag
- Low Search
orderby_sortFilter: https://gotolow.com/...#orderby-sort - Low Search Field Search: https://gotolow.com/...#field-search
- When searching a custom field using Low Search and needing to allow for multiple values as with a checkbox or multi-select field, append
[]to the end of the name attribute: https://gotolow.com/...#field-search-4 - Low Search Category Filter: https://gotolow.com/...#categories
- Channels Categories Tag: https://docs.expressionengine.com/.../categories.html
Move Components To Partials
Now that we have a landing page with an initial set of results and search functions in place, we need a new template to show the search results. Since this page is going to look much like the landing page, we should move some of our components to template partials so they are easy to reuse and we follow DRY principals.
Looking at our page so far, there are two parts that can easily be broken into components:
The Search functions are going to be the same on each page.
While the {exp:low_search:results} opening tag will be different, the template code inside of the {exp:low_search:results} will also be the same.
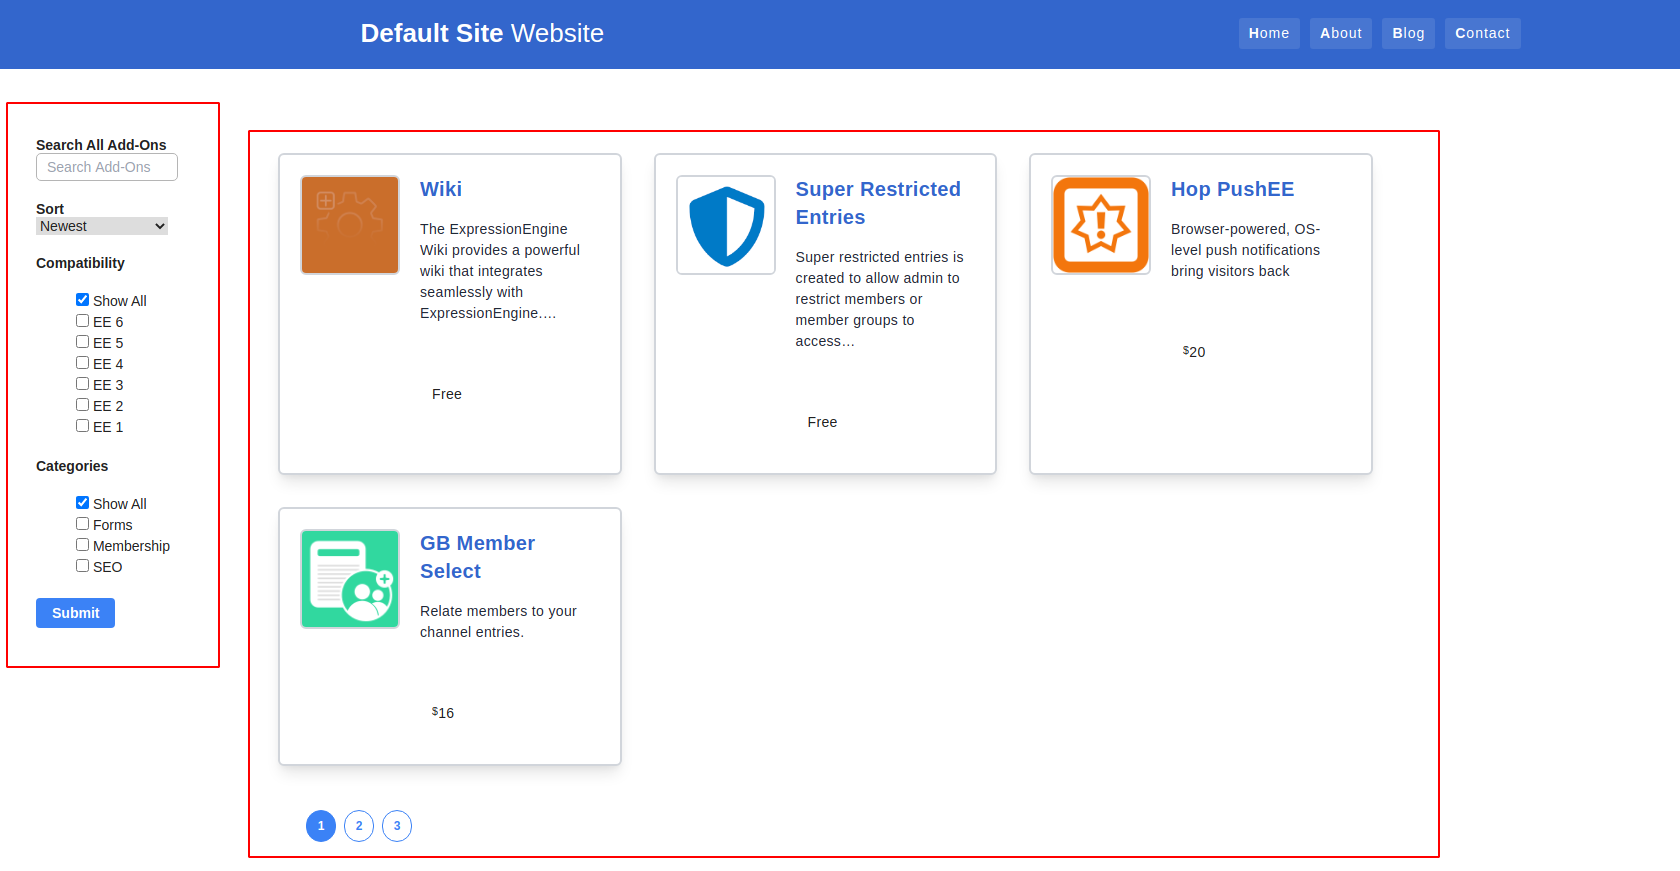
- Search Functions:
- Copy the search functions section div of the page to a new template partial:
_partials/partial_search_functions - Also copy the Javascript needed for the search functions section. We'll include this in the
partial_search_functionspartial to ensure the proper JavaScript is always available when needed. - Then replace the code in our
addons/indextemplate with the template tag{partial_search_functions}
- Copy the search functions section div of the page to a new template partial:
- Results Template Code:
- Copy the template code inside of the
{exp:low_search:results}to a new partial:_partials/partial_search_results. - Replace the code in our
addons/indextemplate with the template tag{partial_search_results}.
- Copy the template code inside of the
Link To Current Template Code:
{partial_search_functions}: https://github.com/ops-andy/eeu-search-favorite-tutorial/blob/main/03-partial_search_functions.html{partial_search_results}:https://github.com/ops-andy/eeu-search-favorite-tutorial/blob/main/04-partial_search_results
Refactoring our landing page brings the template from 290 lines to just 17.
New landing page (addons/index):
{layout='layouts/_html-wrapper'}
{partial_search_functions}

<div class="container my-12 mx-auto px-4 md:px-12 w-10 inline-block align-top">
    <div class="flex flex-wrap -mx-1 lg:-mx-4">
    {!-- Low Search tag pair to display initial set of results--}
    {exp:low_search:results
        channel='add_on_store'
        limit='4'
        paginate="bottom"
    }

        {partial_search_results}

    {/exp:low_search:results}
    </div>
</div>
Link To Current Template Code:
Refactored addons/index template: https://github.com/ops-andy/eeu-search-favorite-tutorial/blob/main/05-new_landing_page.html
Create Results Template
Now that we have our code nicely broken out and we're staying DRY, let's quickly make our results page.
- Copy our
addons/indexas a new template namedaddons/results. - Since we're now dealing with a query and search filters, we need to update our opening
exp:low_search:resultstag in our new template:keywordsparameters allows us control how results are filtered using the keyword input.collectionparameter tells Low Search what collection to use in conjunction with our keyword input.queryparameter tells Low Search where the query string from the search is found in the URLdynamic_parametersallows us to submit a sort order to the results tag
Our opening tag in the results template will now look like the following:
    {exp:low_search:results
    channel='add_on_store'
    limit='4'
    paginate="bottom"
    keywords:mode="all"
    keywords:loose="both"
    collection="add_on_store"
    query="{segment_3}"
    dynamic_parameters='orderby|sort'
    }
At this point, our results template should work as expected.
Current Results Page:
{layout='layouts/_html-wrapper'}
{partial_search_functions}

<div class="container my-12 mx-auto px-4 md:px-12 w-10 inline-block align-top">
    <div class="flex flex-wrap -mx-1 lg:-mx-4">
    {!-- Low Search tag pair to display initial set of results--}
       {exp:low_search:results
        channel='add_on_store'
        limit='4'
        paginate="bottom"
        keywords:mode="all"
        keywords:loose="both"
        collection="add_on_store"
        query="{segment_3}"
        dynamic_parameters='orderby|sort'

        }

        {partial_search_results}

    {/exp:low_search:results}
    </div>
</div>
Link To Current Template Code:
addons/results: https://github.com/ops-andy/eeu-search-favorite-tutorial/blob/main/06-results_page.html
Retain Search Values
Everything is working good as it is now. However, after a user submits a search, all values from their search are cleared from the search functions. To retain this, Low Search gives us a few tags to use.
Keywords:
{if low_search_keywords}value="{low_search_keywords}"{/if}will give a value to our keyword search input if there is a keyword in the search query.<input type="text" name="keywords" class="search-input__input" placeholder="Search Add-Ons" {if low_search_keywords}value="{low_search_keywords}"{/if} >Sort:
{if low_search_orderby_sort =="edit_date|desc"}selected{/if}option value="date|desc" {if low_search_orderby_sort =="date|desc"}selected{/if}>Newest</option>Compatibility:
{if low_search_search:add_on_compatibility *="6"}checked{/if}{if low_search_search:add_on_compatibility *="6"}checked{/if}Categories:
{if low_search_category ~ '/\b'.category_id.'\b/'} checked{/if}{if low_search_category ~ '/\b'.category_id.'\b/'} checked{/if}
Link To Current Template Code:
Search functions partial updated with tags to retain search values:: https://github.com/ops-andy/eeu-search-favorite-tutorial/blob/main/07-search_functions_refactored.html
Summary
At this point, we should have 2 templates and 2 template partials. When put together allows a user to search and filter our add-on entries.
In Part 2, we'll take this to the next by adding AJAX which will automatically submit searches when search function elements change and load the results on the page without refreshing the page or navigating to a new URL.
Link To Final Template Code:
addons/index: https://github.com/ops-andy/eeu-search-favorite-tutorial/blob/main/05-new_landing_page.htmladdons/results: https://github.com/ops-andy/eeu-search-favorite-tutorial/blob/main/06-results_page.html{partial_search_functions}: https://github.com/ops-andy/eeu-search-favorite-tutorial/blob/main/03-partial_search_functions.html{partial_search_results}: https://github.com/ops-andy/eeu-search-favorite-tutorial/blob/main/05-new_landing_page.html
Comments 0
Be the first to comment!