Creating Favorites Using AJAX
Introduction
In Parts 1 and 2 of this series, we set up a search feature on our site where users could search and filter entries, and results were displayed on the page via AJAX. To wrap up our search experience for our users, we're going to add another helpful feature: favorites.
Favorites can be implemented in many forms, such as a favorites list, a wish list, a "save for later" list, or many other variations. For our example, we're simply going to allow the user to just have one favorites list to which they can add their favorite add-ons. To accomplish this, we're going to use EEHarbor's Favorites add-on and some AJAX techniques which we just learned in Part 2.
Building on what we've learned, this feature has a few requirements:
- A user can save their favorite add-on to a list of favorites
- Users should be able to see a list of their favorites
Great! Let's get started
In This Article
- Installing and Configuring Favorites Add-On
- Adding Favorites with AJAX
- All Favorites Listings
- Next Steps
Installing and Configuring Favorites Add-On
Favorites is a pretty robust add-on that allows users to save their favorite entries, create favorite lists, show the most popular entries on a website, and much more. In this article, we're only going to use a small percentage of Favorites' features. Let's get started by installing and configuring the add-on.
- Download and install Favorites.
- Add your license key in the add-on settings.
That's actually all you need to do for our needs. No need to create a collection or anything else.
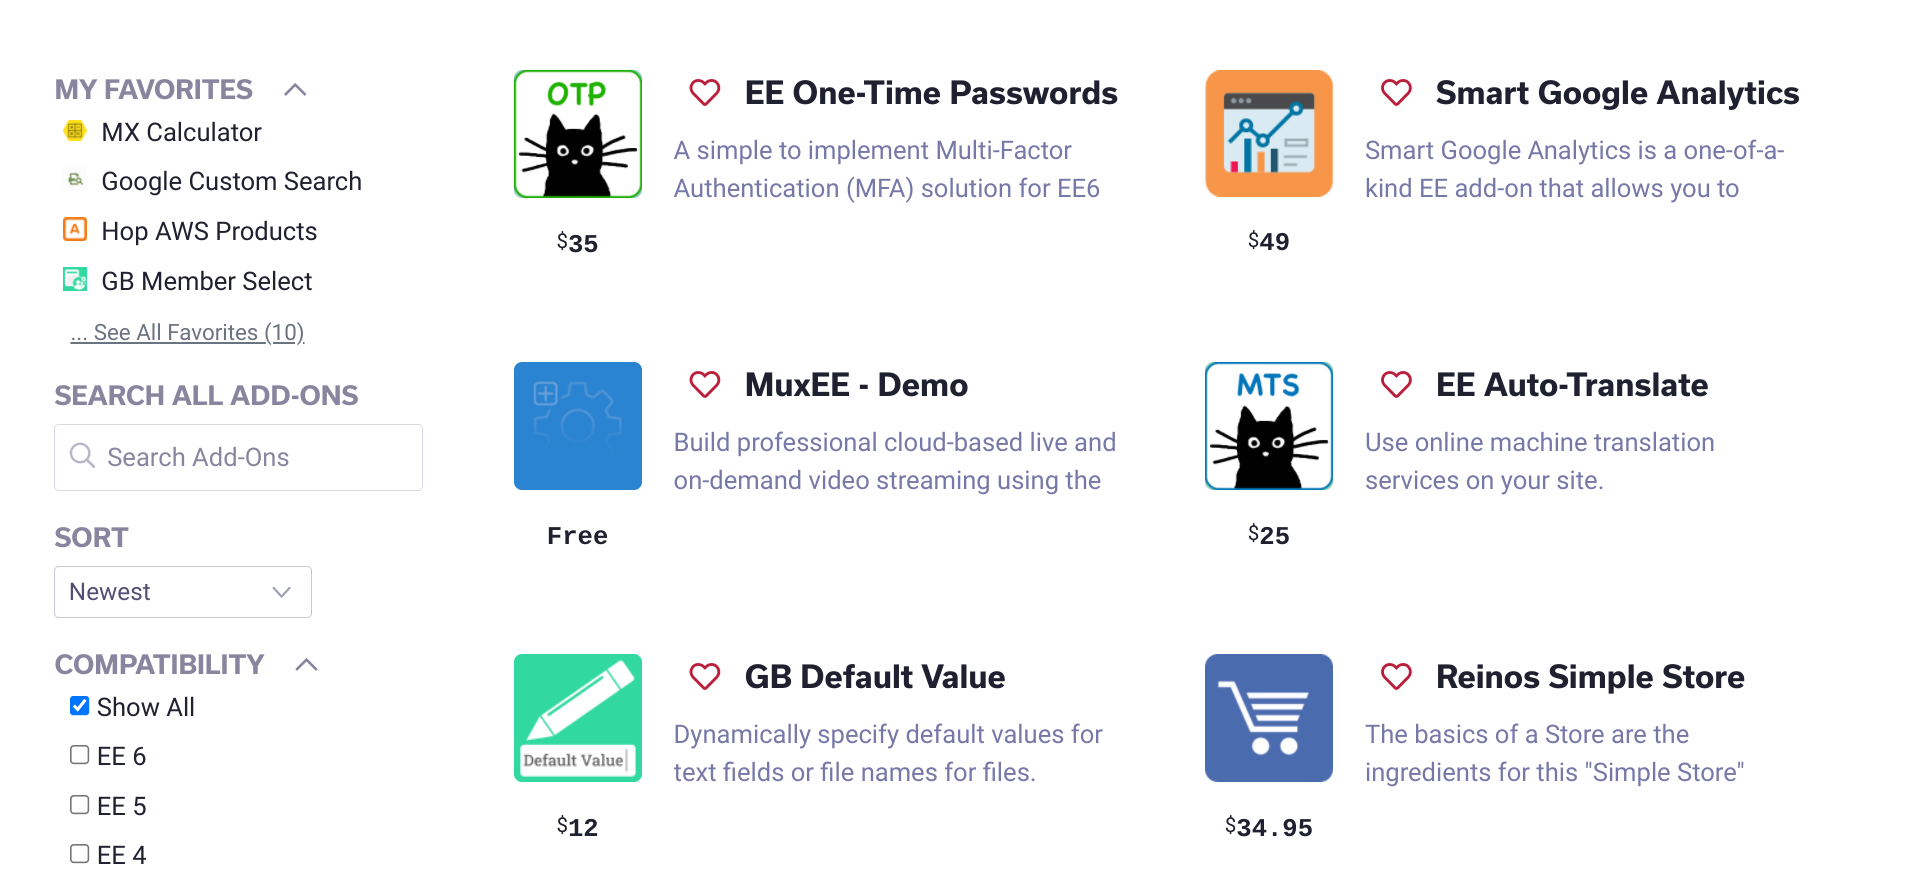
Adding Favorites with AJAX
Now we're going to jump right into the thick of it. Using the amazing AJAX skills we learned in Part 2, we're going to allow users to save their favorites. To do this, we're going to give them a familiar-looking icon that is commonly recognized as a favorite icon, a heart. When the entry is a favorite, the heart icon will be solid in color (  ). When the entry is not a favorite, the heart icon will just be an outline (
  ).
).
Adding Our Button
We're going to add the heart icon to our {partial_search_results} partial.
Current version of the partial from Part 2: https://raw.githubusercontent.com/ops-andy/eeu-search-favorite-tutorial/main/04-partial_search_results
Couple of notes:
- Because we know that Favorites works by creating a form that the user submits, we're going to go ahead and plan for the heart icon to be the submit button for our form. Essentially, clicking the icon is the same thing as submitting the form.
- This icon is using Font Awesome. If you are going to use the same icon as me, then ensure you're including font-awesome on your page.
- Add the button element with the heart icon.
<div id="header" class="flex"> <img alt="addon icon" class="rounded-md border-2 border-gray-300" style="width:100px;height:100px;" src="{add_on_icon}"/> <div id="body" class="flex flex-col ml-5"> <h4 id="name" class="text-xl font-semibold mb-2">{title}</h4> <button class="w-1"> {!-- notice that we're using the class "favorite-toggle" so we can query this element in the DOM later on --} <i class="far fa-heart favorite-toggle"></i> </button> <p id="job" class="text-gray-800 mt-2">{add_on_description:limit characters='100'}</p> <div class="flex mt-5"> <p class="ml-3"> {if add_on_price == '0'} Free {if:else} <sup>$</sup>{add_on_price} {/if} </p> </div> </div> </div> - Now add the CSS for our heart. You can do this either with a
<style>element in your template or through an included CSS file..fa-heart { background: 0 0; color: #ba1f3b; padding: 4px; cursor: pointer; } -
Finally, let's give our listing cards a class that we can easily use in our JavaScript to query the DOM and find our elements. We'll use the class
addon-card.<div class=" flex flex-col my-1 px-1 w-full md:w-1/2 lg:my-4 lg:px-4 lg:w-1/3 addon-card"> <div class="max-w-2xl bg-white border-2 border-gray-300 p-5 rounded-md tracking-wide shadow-lg flex-1"> ... </div> </div>
Link To Current Template Code:
addons/index: https://raw.githubusercontent.com/ops-andy/eeu-search-favorite-tutorial/main/9a-addons-index.html{partial_search_results}: https://raw.githubusercontent.com/ops-andy/eeu-search-favorite-tutorial/main/9-partial-search-results.htmlActivating Our Heart
Next, let's bind an event listener to our heart button. When clicked, we'll add the class "active" and display a solid color heart. When clicked again, the heart will go back to just an outline.
We're eventually going to bind to the form's submit event to the heart icon, but it's good practice as we build on the concept to start small and refactor. So we'll start by binding to the click event.
We already have some JavaScript from our previous article that we are calling on the DOMContentLoaded event. We also know that, similar to our pagination, this event binding will have to take place every time we load new content to the DOM (think about the AJAX responses). Therefore we're going to put this in its own function and then call that function as needed.
- Let's pseudo-code this out
If user clicks heart and entry is not in favorites entry is added to their favorites list heart icon is filled in with color If user clicks heart and entry is already in their favorites entry is removed from their favorites heart icons color is removed leaving an outline -
Since we're just focusing on the
clickevent, we will not worry about adding the favorites list just yet.//addClicktoFavoritesToggle //toggles favorited items //must be called AFTER ajax calls are complete. function addClicktoFavoritesToggle () { //find all buttons in our add-on cards favoriteToggles = document.querySelectorAll('.addon-card button'); favoriteToggles.forEach(favToggle => { favToggle.addEventListener('click', event => { var favHeart = favToggle.querySelector('.favorite-toggle'); //We are using Font-awesome style prefixes to switch between the regular style ("far") and the solid style ("fas") //remove font-awesome classes, then add respective classes favHeart.classList.remove('fas'); favHeart.classList.remove('far'); //if the heart is already active then switch back to the outline only (regular) style. if (favHeart.classList.contains('active')) { favHeart.classList.remove('active'); favHeart.classList.add('far'); }else{ favHeart.classList.add('active'); favHeart.classList.add('fas'); } }); }); } -
Now, let's just update our
DOMContentLoadedevent to call our new function after results are loaded.//on load create AJAX request document.addEventListener('DOMContentLoaded', event =>{ //submit the response with fetch() fetch(baseUrl() + "/ajax/addon-results") // take our response and get the HTML we really want .then(response => { return response.text(); }) // take our HTML and replace the contents of our #addon-results element .then(data => { resultsTarget.innerHTML = data; paginationLinks(); //call our new function addClicktoFavoritesToggle(); }); });If all went as planned, your heart icons should now switch between the regular and solid styles when you click on them.
- As we know, we're not actually adding anything to our favorites list yet when the hearts are clicked. Next, let's explore how Favorites works and connect our hearts.
Understanding Favorites and Tags
There are two main actions that we want to be able to do with Favorites:
- Add to our Favorites list
- Remove from our Favorites list
Special Notes:
- By default
{exp:favorites:info}only shows favorites for the currently logged-in member. Therefore if you are not logged in, you will not see the Favorites form (our heart icon). - As described in the docs ( https://eeharbor.com/favorites/documentation/info#disable_pagination ), nesting the
{exp:favorites:info}inside of template tags that use pagination can cause issues. Thus we will be using thedisable_pagination="yes"parameter.
- Let's look at the tags we'll need to connect Favorites.
According to the docs, to create a form that will allow a user to add an entry to their favorites, we need to use the
{exp:favorites:form}tag, and to remove an entry from a list of Favorites, we use the{exp:favorites:edit}tag.That's great if you're going to have different templates that display favorites vs non-favorites. However, for our needs, we need to flip-flop between an add-to favorites form and a remove-from favorites form in the same place and without reloading the page. Let's pseudo-code this:
On page load If entry is already in favorites display edit tag with a solid heart If entry is not in favorites display form tag with an outlined heart -
The EEHarbor website has an example of how to do this using the
{exp:favorites:info}tag: https://eeharbor.com/favorites/documentation/form#examples. So next we apply this to our{partial_search_results}partial.First, here is just the code for the heart button and our Favorites form.
{!--favorites:info list info about an entry --}
{exp:favorites:info
    entry_id="{entry_id}"
}
    {!-- display the edit form if an entry is found in Favorites --}
    {exp:favorites:edit
        favorite_id="{favorites:favorite_id}"
        return="add-ons"
    }
        {!-- tells the edit form we want to delete the entry from favorites --}
        <input type="hidden" name="delete" value="yes">
        <input type="hidden" name="entry-id" value="{entry_id}">
        <button class="w-1" type="submit" value="Remove">
            <i class="fas fa-heart favorite-toggle active"></i>
        </button>
    {/exp:favorites:edit}

    {!-- if no entry is found in favorites, then it's not in a favorites list yet
    Thus display the favorites:form tag --}
    {if favorites:no_results}
        {exp:favorites:form
            entry_id="{entry_id}"
            return="add-ons"
        }
        <input type="hidden" name="entry-id" value="{entry_id}">
            <button class="w-1" type="submit" value="Add">
                <i class="far fa-heart favorite-toggle"></i>
            </button>
        {/exp:favorites:form}

    {/if}
{/exp:favorites:info}
Now combine that with the rest of our entry listing in
{partial_search_results}<div class="max-w-2xl bg-white border-2 border-gray-300 p-5 rounded-md tracking-wide shadow-lg flex-1"> <div id="header" class="flex"> <img alt="addon icon" class="rounded-md border-2 border-gray-300" style="width:100px;height:100px;" src="{add_on_icon}"/> <div id="body" class="flex flex-col ml-5"> <h4 id="name" class="text-xl font-semibold mb-2">{title}</h4> {exp:favorites:info entry_id="{entry_id}" disable_pagination="yes" } {exp:favorites:edit favorite_id="{favorites:favorite_id}" return="add-ons" } <input type="hidden" name="delete" value="yes"> <input type="hidden" name="entry-id" value="{entry_id}"> <button class="w-1" type="submit" value="Remove"> <i class="fas fa-heart favorite-toggle active"></i> </button> {/exp:favorites:edit} {if favorites:no_results} {exp:favorites:form entry_id="{entry_id}" return="add-ons" } <input type="hidden" name="entry-id" value="{entry_id}"> <button class="w-1" type="submit" value="Add"> <i class="far fa-heart favorite-toggle"></i> </button> {/exp:favorites:form} {/if} {/exp:favorites:info} <p id="job" class="text-gray-800 mt-2">{add_on_description:limit characters='100'}</p> <div class="flex mt-5"> <p class="ml-3"> {if add_on_price == '0'} Free {if:else} <sup>$</sup>{add_on_price} {/if} </p> </div> </div> </div> </div>Link To Current Template Code:
Key Concepts
{exp:favorites:info}https://eeharbor.com/favorites/documentation/info{exp:favorites:form}https://eeharbor.com/favorites/documentation/form{exp:favorites:edit}https://eeharbor.com/favorites/documentation/edit
- Switching between forms on page load is a good start, but what about when a user clicks on our heart icon? In that case, the form itself should change. To plan this out, we'll grab our pseudo-code from the click event above and combine it with what we just wrote.
If user clicks heart and entry is not in favorites
    entry is added to their favorites list
    heart icon is filled in with color
    Favorites form changes from form tag to edit tag
If user clicks heart and entry is already in their favorites
    entry is removed from their favorites
    heart icons color is removed leaving an outline
    Favorites form changes from edit tag to form tag.
This is all good, except we just have template tags to work with, and we can't reload template tags without reloading the page. Therefore we have to manipulate the DOM and change the form manually.
To accomplish this, we will create the Favorites form in another template, then use AJAX to call out to that form each time a heart icon is clicked. This will render the respective Favorites tag in the other template and allow us to replace the form in our entry with the output of the other template. I promise that it sounds more confusing than it really is.
Note: The first time I did this, I tried to just change the inputs and properties of the form on the fly. However, Favorites writes data to the database and then looks for that data when updating entries. Thus, we actually need to re-render the template tag for everything to work properly, and that is why using another template is the best method.
Connecting and Hijacking Favorites
We now understand a little more about what work we have to do. Let's roll up our sleeves and get started.
First, we're going to update our click event listener from above. We now are dealing with a form element (rendered by the Favorites template tags). This means that a click event won't cut it anymore. Similar to what we did to Low Search forms in previous lessons, we now need to hijack the form and submit it via AJAX.
- Refactor the
clickevent to capture the form submission and prevent the default form action which would redirect the user to another page on success.//addClicktoFavoritesToggle //toggles favorited items //must be called AFTER ajax calls are complete. function addClicktoFavoritesToggle () { //notice we now are updating our selector to find the form, not the button favoriteToggles = document.querySelectorAll('.addon-card form'); favoriteToggles.forEach(favToggle => { favToggle.addEventListener('submit', event => { //stop the user from being directed to the add-on page event.preventDefault(); var favHeart = favToggle.querySelector('.favorite-toggle'); //We are using Font-awesome style prefixes to switch between the regular style ("far") and the solid style ("fas") //remove font-awesome classes, then add respective classes favHeart.classList.remove('fas'); favHeart.classList.remove('far'); //if the heart is already active then switch back to the outline only (regular) style. if (favHeart.classList.contains('active')) { favHeart.classList.remove('active'); favHeart.classList.add('far'); }else{ favHeart.classList.add('active'); favHeart.classList.add('fas'); } }); }); } -
Now let's submit the form via AJAX using
formData()//addClicktoFavoritesToggle //toggles favorited items //must be called AFTER ajax calls are complete. function addClicktoFavoritesToggle () { favoriteToggles = document.querySelectorAll('.addon-card form'); favoriteToggles.forEach(favToggle => { favToggle.addEventListener('submit', event => { //stop the user from being directed to the add-on page event.preventDefault(); var favHeart = favToggle.querySelector('.favorite-toggle'); //make the ajax request to favorite the entry var formData = new FormData(favToggle); fetch(favToggle.action, { method: 'post', body: formData }) .then(response => { return response.text(); }) .then(data => { favHeart.classList.remove('fas'); favHeart.classList.remove('far'); //if the heart is already active then switch back to the outline only (regular) style. if (favHeart.classList.contains('active')) { favHeart.classList.remove('active'); favHeart.classList.add('far'); }else{ favHeart.classList.add('active'); favHeart.classList.add('fas'); } }); }); }); } -
Right now, you should be able to submit the form, have it sent over AJAX, and then the heart icon will now toggle regular/solid styles.
This is good, except every click is just either continually adding to Favorites or removing from favorites (which will cause errors) depending on what the initial state of the form was. This is because we are not updating the form on successful AJAX responses.
So now, we'll create our secret weapon, a Favorites form-only template. This template will render our heart icon and form based on the current status of a given entry. We'll grab the output of that form and replace the current form in the DOM.
We'll call this template
addon-favorites-formand put it in our "ajax" template group. This will allow us to access the template via the URL:/ajax/addon-favorites-form{exp:favorites:info entry_id="{segment_3}" disable_pagination="yes" } {exp:favorites:edit favorite_id="{favorites:favorite_id}" return="add-ons" } <input type="hidden" name="entry-id" value="{segment_3}"> <input type="hidden" name="delete" value="yes"> <button type="submit" value="Remove"> <i class="fas fa-heart favorite-toggle active"></i> </button> {/exp:favorites:edit} {if favorites:no_results} {exp:favorites:form entry_id="{segment_3}" return="add-ons" } <input type="hidden" name="entry-id" value="{segment_3}"> <button type="submit" value="Add"> <i class="far fa-heart favorite-toggle"></i> </button> {/exp:favorites:form} {/if} {/exp:favorites:info}As you can probably tell, this is the same form our results initially load with.
- Now that we have our form in our template, let's update the JavaScript to request the contents of that template via AJAX after a successful response when adding the selected entry to our Favorites.
//addClicktoFavoritesToggle //toggles favorited items //must be called AFTER ajax calls are complete. function addClicktoFavoritesToggle() { favoriteToggles = document.querySelectorAll('.addon-card form'); favoriteToggles.forEach(favToggle => { favToggle.addEventListener('submit', event => { //stop the user from being directed to the add-on page event.preventDefault(); var favHeart = favToggle.querySelector('.favorite-toggle'); //make the ajax request to favorite the entry var formData = new FormData(favToggle); fetch(favToggle.action, { method: 'post', body: formData }) .then(response => { return response.text(); }) .then(data => { favHeart.classList.remove('fas'); favHeart.classList.remove('far'); //if the heart is already active then switch back to the outline only (regular) style. if (favHeart.classList.contains('active')) { favHeart.classList.remove('active'); favHeart.classList.add('far'); }else{ favHeart.classList.add('active'); favHeart.classList.add('fas'); } //here we're grabbing the entry-id from the form's input var entry = favToggle.querySelector('input[name="entry-id"]').value; //submit an AJAX request to our new form template fetch('/ajax/addon-favorites-form/'+entry) .then (response => { return response.text(); }) .then (data => { //now that we have a response. let's delete our current form and replace it with //the html in our response //we're about to delete the form we clicked on so we need //another point of reference. This will select the <h4> previous //to the form element var formPositionSibling = favToggle.previousElementSibling; //now lets remove our current form from the DOM formPositionSibling.parentNode.removeChild(favToggle); //next we insert our form from the AJAX response immediately // after our <h4> element. formPositionSibling.insertAdjacentHTML('afterend',data); //the form is new to the DOM, so we need to make sure The // the new form's submit event has an event listener as well. addClicktoFavoritesToggle(); }); }); }); }); } -
The final step is to double-check that you are calling
addClicktoFavoritesToggle();
Link To Current Template Code:
addons/indextemplate: https://raw.githubusercontent.com/ops-andy/eeu-search-favorite-tutorial/main/13-addons-index{partial_search_results}: https://raw.githubusercontent.com/ops-andy/eeu-search-favorite-tutorial/main/13-partial-search-results{addon-favorites-form}: https://raw.githubusercontent.com/ops-andy/eeu-search-favorite-tutorial/main/13-addon-favorites-form
Fantastic! You should now be able to load your page, click your heart icons to favorite/unfavorite entries, and click through searches and pagination with your favorites still saved. All this while remaining on the same page and no screen refreshes.
All Favorites Listings
Creating a template to display all of a user's favorite entries isn't really that hard. Favorites provides the {exp:favorites:entries} tag which makes listing these entries super easy. Of course, we don't want the user to have to navigate to a new URL, so we will use some more AJAX. Let's jump right in.
To keep ourselves DRY, we'd rather not repeat all the code we have in the {partial_search_results} partial. So we need to make one adjustment: moving our {if low_search_no_results} conditional from {partial_search_results} to our ajax/addon-results template. You can figure out where it goes, or check out the link
- We'll start by adding a new template in our "ajax" template group named "addon-favorites".
{exp:favorites:entries limit='999' paginate='bottom' status="not closed" } {!-- if no results, let the user know --} {if no_results} <div class="alert alert--empty">No add-ons have been added to your favorites.</div> {/if} {partial_search_results} {/exp:favorites:entries} -
Now we need a way for our users to see their favorites, so we'll add a simple link to the sidebar. When users click on this link, we'll make an AJAX request to our new template and return the results. This should be pretty simple based on the work we've already done.
First is the link. We're adding this to the top of ourpartial_search_functionspartial where the rest of the sidebar lives.div class="container my-12 mx-auto px-4 md:px-12 w-2 inline-block align-top"> <a href="ajax/addon-favorites" id="see-all-favorites">View My Favorites</a> <hr> <div class="font-bold">Search All Add-Ons</div> ... -
Next, let's wrap it up with some JavaScript. Again, just put this wherever you've been putting your JavaScript up to this point.
function showFavoriteResults() {
    //get results for users favorites
    document.getElementById("see-all-favorites").addEventListener('click', event => {
        //stop the user from being redirected
        event.preventDefault();
        fetch(document.getElementById("see-all-favorites").href)
        .then(response =>{
            return response.text();
        })
        .then(data => {
            resultsTarget.innerHTML = data;
            paginationLinks();
            addClicktoFavoritesToggle();
        });
    });
}
Be sure to add a call to our new function in our
DOMContentLoadedevent listener.
Link To Current Template Code:
addons/indextemplate: https://raw.githubusercontent.com/ops-andy/eeu-search-favorite-tutorial/main/14-addons-index.htmlajax/addon-favoritestemplate: https://raw.githubusercontent.com/ops-andy/eeu-search-favorite-tutorial/main/14-addon-favorites.html{partial_search_functions}: https://raw.githubusercontent.com/ops-andy/eeu-search-favorite-tutorial/main/14-partial-search-functions.html
Key Concepts
{exp:favorites:entries}https://eeharbor.com/favorites/documentation/entries
That's it! You should now have a fully working favorites form on each entry as well as a link that allows the user to see all their favorites
Next Steps
If you've followed all three parts of this series then congratulations! Here is a link to the final templates folder: https://github.com/ops-andy/eeu-search-favorite-tutorial/tree/main/final_template_folder.
There's still more you can do though! On expressionengine.com, we have a sidebar component that shows a user's 5 most recent favorited entries. There are also several JavaScript functions that could be combined to be a little more DRY. Same thing with templates. What else do you think would improve the user's experience, make our site more performant, or add clarity to the code?
Let me hear about how you implement this or new ways to do the same thing! I'd love to hear from you as we help grow the community together!
Comments 2
IC360 (Oliver Cannell)
Great tutorial Andy. Very thorough and useful. I’m looking forward to trying this one out sometime on one of my ecommerce sites. It might just be my first foray into AJAX!
Andy McCormick
👍 Glad you found it helpful. Feel free to let me know if you have any questions.