Planning the Content Model
- 1 - Introduction to ExpressionEngine
- 2 - How ExpressionEngine Thinks About Content
- 3 - Planning the Content Model
- 4 - Installation & Basic EE Setup
- 5 - Building Our Content Model - Directories, Categories & Fields
- 6 - Building Our Content Model - Channels, Adding Content & Publish Layouts
- 7 - Templating Intro - Templates, Template Groups & Staying DRY
- 8 - Templating - Single Entry Templates
- 9 - Templating - Multi-entry Templates
- 10 - Final Touches - Contact Form, SEO Metadata, Error Handling & Performance Optimization
Planning is an important step in any process, including building in ExpressionEngine, so let's start working through our content model's plan for this site. In fact, we're even going to actually add content to the site before we ever even attempt to output it to templates. This might seem obvious when building a new site from scratch, but the same sequence applies even with adding features, Channels, or Fields to existing sites:
- Plan Your Content
- Build The Content Model
- Add Actual Content
- Display Content In Templates
In This Article:
- Helpful Concepts
- Step 1 - Establish the Channels
- Step 2 - Establish the Fields in Each Channel
- Step 3 - Consider Field Groups
- Step 4 - Consider Categories & File Upload Directories
Helpful Concepts
Native vs. Visiting
When looking at design templates to figure out a content model, learn to ask yourself - “Is the content native to this page or visiting?” In other words, does this content live here? If I wanted to link someone to this content, would this be the page that I link them to? Or is the content just “visiting” this page and it lives somewhere else?
Homepages are often a party of visiting content from the rest of the site where in many cases, the hero carousel images are really the only thing unique to the Homepage and the rest of the content is often pulled in from other places like news articles, blog posts, featured products, upcoming events, testimonials, etc. Our setup for this tutorial is similar - we'll have content visiting from the “Work” section.
Thinking about content as being native or visiting is important because it will help you figure out how to organize your Content Model. For our site, since we know the Work/Portfolio content is only visiting the homepage, the Content Model for the Homepage doesn’t need to accommodate any Work information.
Multi-entry & Single Entry
Another template-evaluation question to ask yourself “Is this a multi-entry page or a single-entry page?” The easiest content type to picture here is the standard blog. Blog indexes are usually multi-entry - because they display a listing of your most recent posts. The entire post isn’t usually shown, but rather the title, post date, and a summary or portion of the entire blog post. When you want to read the entire post, you click the title or a read more link. The page you go to can be thought of as the single-entry for that blog post.
Why is this important for Content Modeling? Content Types often get split across multi-entry and single-entry templates. Look at that blog entry again. It could be that the summary on the multi-entry page doesn’t appear on the single-entry page. And the full text of the blog entry that shows on the single-entry doesn’t appear on the multi-entry. The Content Type is split across the views of the content, so you have to look in both places for the bits that make up a Blog Entry.
These next two concepts were also written originally by Mike Boyink and reused with permission.
Step 1 - Establish the Channels
With all of the above in mind, we can start to think about how we want our content structured. In this particular example, we don't have a particular design we're striving for, but in a real-world scenario, that's likely where you'll start to get a sense of the different types of content the site contains. Here's a reminder of our target sitemap for this tutorial:
- Home
- Services
- Graphic Design
- Web Development
- Digital Marketing
- Work (with multiple individual project subpages)
- About
- Contact
The most obvious collection of content where we will have multiple entries is "Work," where each Project has its own set of information, but each one will follow a similar structure in terms of the data contained within them.
NOTE: A few more examples that we don't happen to have in this tutorial include things like Blog Posts, News Articles, Products, Events, Locations, Testimonials, Team Members, etc. All of these types of content are best suited to be in a dedicated Channel, and you would consider in the content modeling planning.
Looking to our sitemap, Services is unique in that it has sub-pages, whereas the other pages don't. The sub-pages may not change often, but because Services could likely be added over time, we will be using a single Channel to represent all the pages in that section, including the main Services landing page and the 3 sub-pages (and any future Service sub-pages that may be necessary).
The Home, About, and Contact pages are just single pages, so we'll have a Channel for each and limit those Channels to only hold 1 entry.
NOTE: Remember, there are multiple ways to build in EE, and this tutorial is intentionally only covering native EE methods. It's also possible to have one single Channel that would hold all of the 'single' pages mentioned above, but using separate Channels for each root-level menu item helps to learn the fundamental concepts and default template routing.
So at a high level, our final set of Channels will be:
- Homepage (limited to 1 entry)
- Services (one 'landing page' and multiple sub-pages)
- Work (one 'landing page' and multiple sub-pages)
- About (limited to 1 entry)
- Contact (limited to 1 entry)
Step 2 - Establish the Fields in Each Channel
Next, we need to consider carefully the information we want our channels to hold so we know what Fields to create. In a real-world scenario, this is where you look at the specifications of the project or an approved design or direction from the Project Manager, but for this example, we'll be assuming:
- The homepage will have a fixed layout with a hero carousel that can have multiple slides, an introductory heading, some introductory text, and links to the latest 3 pieces of work
- Each piece of work will also have a fixed layout for consistency where each consists of a project title, a date it was launched, an excerpt to use as a summary, the client's name, a link to the work, the category of work so we can filter by category, a project description and multiple images each with a caption.
- The rest of the pages (including the Services and all its sub-pages) will not have a fixed layout, but instead need to allow a layout to be built up using re-usable elements with varying content. For this, we'll use a Fluid Field so users can add multiple types of content in whatever order they'd like, but only using pre-determined Fields that allow us to maintain consistency with content and styling.
NOTE: A Fluid Field is a relatively new and unique fieldtype in ExpressionEngine that allows the content editors to add other Fields that are available to it in any order they want. As we build out this example, you'll understand just how flexible and useful this is.
Default Fields
It's worth pointing out at this stage that EE uses several default fields in every channel because often we can use those instead of having to create our own. Examples include:
- Entry Title - all entries must have a Title to be identified in the CMS, but we can also use that in our templates. The Title can be renamed for each Channel (e.g., it could be renamed to "Project Title" for our Work Channel or "Full Name" for a Team Members Channel), but it must be present.
- URL Title - the URL Title is a URL-friendly version of the Title and is what shows in the URL for EE's default template routing (which we'll cover later on). This is automatically generated as you type in the Title, but can be customized if needed.
- Entry Date - this identifies when the entry was published. By default, the Entry Date is set to the timestamp of when the entry was first created, but you can manually change this. EE won't show content in templates unless the Entry Date is in the past, so you can also use this to schedule when content is published to the site.
- Expiration Date - similarly, EE won't show content in templates if the Expiration Date is in the past, so you can use this to schedule the removal of content from the site. This is not recommended for any content that has its own unique URL however, as this could cause a 404 from indexed pages in search engines.
- Status - this is a way to identify different statuses that EE can use to establish whether - or how - to display content in the templates. The two default statuses are open and closed where 'open' entries are published and available to display (so long as the Entry Date is in the past and Expiration Date is either not set or in the future) and 'closed' entries by default don't show on the site at all. However, they are still in the CMS, so they can be restored by 're-opening'.
- Author - each entry has an associated Author, which by default is the user that first created it, but can be manually updated. This is useful for things like Blog Posts where you want to filter by Author or display who wrote each post.
- Sticky - this is a Toggle field that lets you mark a particular entry as 'sticky', which means the entry will be given preference in sorted listings. Think of this like 'pinning' an entry to the top of the list.
Grids & File Grids
You'll get a sense of all the different Fieldtypes I'm proposing as we go through the build, so don't worry too much if you don't know what they are at this stage. However, it is worth explaining Grid and File Grid fields.
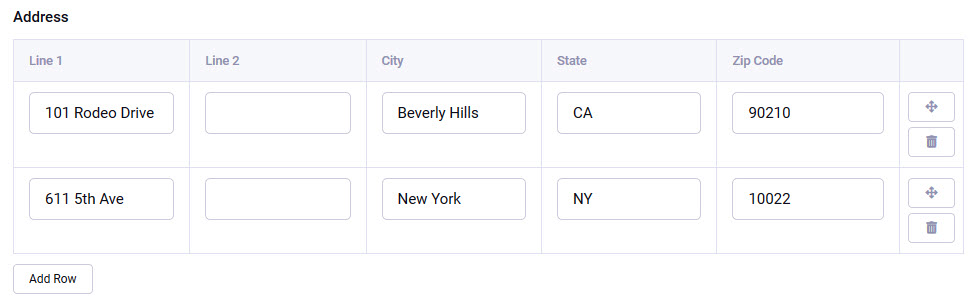
Grid fields allow the content editor to add multiple rows of information, where each row can contain multiple columns of data. These are incredibly useful for things like image galleries, carousels, expanding accordion panels, tab groups, or even specific types of content that require multiple parts in a specific format like an address:
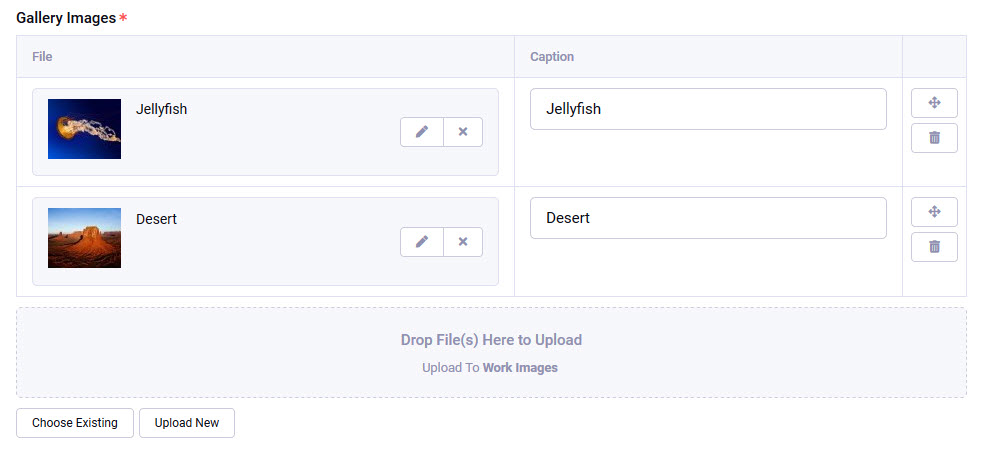
File Grid fields are the same concept, but differ in that the first column of each row is a required file (which could be an image or document) and offers a handy drag-and-drop interface where you can select multiple files from your computer and drop them all at once to populate the rows:
Getting back to our tutorial, breaking this down our high-level Channel structure into individual Fields, we'll need:
Homepage Channel
- Page Heading (Text Input)
- Page Intro (Rich Text)
- Hero Carousel (File Grid) - holds multiple 'slides', each with an image, heading and text
For the Homepage, we're also going to display the newest three Work entries, but notice we don't have an explicit field for that - remember the concept of 'visiting content'. So we will be pulling in this content automatically, and we deliberately don't want the content editor to be able to remove or edit those - their display will be based on dates to always show the latest three. We'll be doing this later when we start working on pulling content through in the templates.
Work Channel
- Project Title (EE's default Title field, but renamed)
- Page Heading (Text Input) - we'll use this to allow an override to the H1 on the page, which we'll make the Project Title by default
- Entry Date (EE's default Entry Date field)
- Excerpt (Text Input)
- Client Name (Text Input)
- External Link (URL)
- Project Description (Rich Text)
- Images (File Grid) - holds multiple images each with a caption
- Categories (EE Categories Group)
Services & About Channels
- Page Heading (Text Input)
- Page Intro (Rich Text)
- Page Builder (Fluid Field) - allows the user to build up content using pre-defined Fields made available to the Fluid Field. To keep things relatively simple, we'll build and make the following Fields available:
- Centered Heading (Text Input)
- Rich Text (Grid) - we'll use a Grid so we can offer some display options
- Rich Text & Image (File Grid) - this will be a 50/50 row with content in one half and an image in the other, and again, we'll offer some options
- Featured Work (Relationships) - this will allow the page to display links to specific Work entries on any page
- Document Downloads (File Grid) - allows a series of downloadable documents, each with a title and summary
Contact Channel
- Page Heading & Page Intro fields reused from above
- Map Embed Code (Textarea) - to embed a Google Map
- Address (Grid) - we'll assume there's just one location
- Departments (Grid) - each with a name, phone number and email address
This is a good starting point for a beginner tutorial that showcases a lot of what EE can do without going overboard.
Step 3 - Consider Field Groups
We learned in the last installment that Field Groups allow you to group a selection of Fields and apply the whole group to a Channel at once, so looking at our Channel structure, it makes sense to utilize Field Groups in two places:
- Work. This is our largest collection of fields by far, and most of them are exclusive to the Work Channel. This is also the Channel that has the most likelihood of growing over time, so we'll go ahead and create a Field Group to hold all those fields, so we don't have to assign each Field to the Channel, and we can easily add more fields in future.
- Pages. Notice the Fields the About and Services Channels will be using are the same - so we'll create a Field Group and assign that to these Channels instead of having to assign individual Fields to each Channel. The fields to include in this Field Group are: Page Heading, Page Intro and Page Builder
You don't necessarily have to use Field Groups at all - you could individually assign Fields to Channels and achieve the same thing. However, it's useful to understand, particularly because in earlier versions of ExpressionEngine, Fields couldn't be shared across Channels, and the Field Groups were exclusively used for assigning groups of Fields to Channels. So if you ever end up working on or upgrading an EE site from before Version 4 of ExpressionEngine, you'll certainly see these being used and want to understand how they work.
Step 4 - Consider Categories & File Upload Directories
In Step 2 above, we identified one place we'll be using Categories (Work entries), several places we'll be using images (Homepage carousel, Work entries, and the Rich Text & Image field that will be available to our Page Builder Field), and one place we'll be linking to documents (the Document Downloads field available to our Page Builder Field). It's worth thinking about these things in the planning stage too.
Categories
With categories, it's often the case you need the client's input, so thinking about it now enables you at the very least to request the list from the client, even if you have to start building with incomplete or even dummy categories.
For this tutorial, we'll assume a fairly simple Category structure for the Work channel that matches the Service sub-pages:
- Graphic Design
- Web Development
- Digital Marketing
File Upload Directories & Image Manipulations
For images and documents, it's more efficient to set up any necessary File Upload Directories before we start building our Fields. Any Field that links to a file can be set to explicitly utilize one specific File Directory rather than allowing the content editor to be able to select from 'all' directories, but only if they're already set up. If they're not set up when creating the Field, you'll have to save the Field with the ability to access 'all' directories, go back and create a new directory, then return and edit the Field - it's definitely doable, and you'll do this many times, but if you get in the habit of thinking about it in the planning and content modeling stages, you'll save yourself some time.
Image Manipulations
At this point, it's worth understanding Image Manipulations. ExpressionEngine can automatically create multiple different versions of uploaded images with different settings based on your needs.
Upload Directory Specific Image Manipulations
This is the original way of using Image Manipulations in EE. Each Upload Directory can have pre-defined Manipulations configured where each one can either be cropped to a specific size or constrained to a maximum width and/or height (while keeping its original aspect ratio) and optionally can also have 'watermarks' applied to them that you can configure.
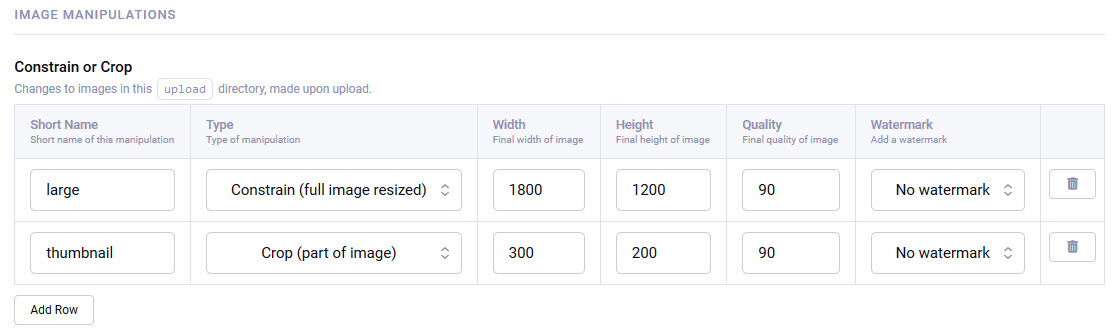
Using dedicated Upload Directories for images used in specific ways (e.g., Product Images vs News Images vs Gallery Images) allows you to create pre-defined Manipulations specific to how you'll be using images for each use case. For example, your Product Images might need one version to be cropped to 600x400px and another for the thumbnails at 100x150px, but your Gallery Images need a full size version constrained to a maximum of 1800px wide or 1200px tall and a different size cropped thumbnail at exactly 300x200px. So in scenarios where you know you'll be using several different sizes of the same image, using a dedicated Upload Directory with pre-set image manipulations is a good option.
On-the-Fly Image Manipulations
On-the-fly image manipulations are new to EE6 and let us specify in the template what the manipulation should be rather than having to use pre-defined manipulations based on the Upload Directory. On-the-fly image manipulations are created the first time the template renders and stores the manipulated version of the image on the disk, so it's still efficient (i.e., it doesn't have to generate literally for every page-load), but isn't tied to a specific Upload Directory. This is really useful when you want to give the content editor the choice of what Upload Directory to use, but you still want to use specific sized images.
NOTE: Another amazing new addition to EE6 is the ability to convert images to WebP format in templates!
Why Do You Need Multiple Upload Directories?
ExpressionEngine allows you to create multiple Upload Directories, and there are several reasons you might want to use several different directories:
- To keep files organized Different Upload Directories literally use different folders in the file system - it's nice to have files and images separated physically based on how they're being used in the site.
- To improve usability File Fields allow you to explicitly set which Upload Directory to use - doing this means the content editor doesn't even have to think about which directory to select and forces files used in certain places to go to the right directory, which saves time and effort on every upload.
- To limit the type of file that can be used Each EE Upload Directory can be set to either allow
Images OnlyorAll Files, which is useful as most site content models need Fields to specifically hold images. Imagine a field that lets the user upload.pdfor.docxfiles in a place where the templates were creating an image gallery. - To limit the size of file that can be used Each Upload Directory can also be configured to accept a maximum filesize (in kb) of the originally uploaded file and/or if it's an image, a maximum width and height (in pixels). You may want to restrict specific image sizes differently in one place compared to another.
- Efficiently utilize directory-specific image Manipulations Though we now have on-the-fly image manipulations, there likely will be certain scenarios where having a pre-defined set of image manipulations makes more sense. If you do have Manipulations setup for an Upload Directory, every single image that is uploaded there gets all of the manipulations created (regardless of if they're actually used), so it's more efficient in terms of disk space usage if pre-defined manipulations only used for Upload Directories where you know you'll be using all the manipulations (e.g., Products or Galleries). Also, if you ever happen to work with an older EE site, understanding this concept is worthwhile.
- Restrict access based on Member Role This is more advanced, and we won't be diving into membership in this tutorial, but each Upload Directory can also be restricted to only allow access to certain Member Roles. An example of this would be using different directories to hold files from different types of website members.
Our Plan for File Upload Directories
So for our purposes in this tutorial, we'll plan to set up 4 separate Upload Directories:
- Hero Banners, which will be images only and we won't restrict the filesize, but we will create a Manipulation that creates a cropped image at 1110x500px
- Work Images, which will be the same, but we'll need different Manipulation sizes
- Page Images, which we'll use to hold images uploaded to the Rich Text & Image field available in our Page Builder Field - this time though, we won't use pre-set Image Manipulations, but instead we'll manipulate these images on-the-fly.
- Documents, which can hold all types of files, and we'll use this for holding any documents uploaded in the Document Downloads field available in our Page Builder Field.
What's Next?
So far, everything we’ve done is CMS-agnostic. We’ve looked at the end goal and broken it down into a generic Content Model. In the following chapters, we'll actually get to building in ExpressionEngine, which starts with installing the CMS in Part 4.